Tag Archives: Organization

Cleaned Up Computer Files

Throughout the school year we accumulate lots and lots of electronic files of all kinds. All of these files are stored somewhere on your computer, but where? When you go to look for an important document does it take you 5 seconds or 5 annoying minutes to find it? Or worse, maybe you can’t find it at all and are forced with having to recreate it or hunt it down elsewhere…argh! A cluttered desktop and unorganized computer files can really slow you down and we coaches/teachers do not have time to waste.

If your docs could also benefit from some tidying, a few hours dedicated to tackling this project might really pay off in the happy and effective coach/teacher factor. Take a look at how I went from “Boo” to “Woo Hoo!”

Cleaned_Up_Files_Before_After_130521

For Customized Desktop Wallpaper of your own, click here!


STEP_1

Sort_and_Purge_Visual

Subfolders_and_Naming_Sign

As you create your subfolders and continue to sort, notice how you’ve been naming your files. If you haven’t been using dates as part of your naming system, you might consider beginning to do so.  Here’s an article that helps explain why.

Subfolders-and-Naming-Visual


Step_3

Here’s the fun part! Now that you’ve done all that sorting and purging, choose an inspiring desktop wallpaper that will help prevent future clutter.

Screen Shot 2013-05-23 at 4.43.23 PM

There are lots of different ways to keep your computer files organized. Any tips or tricks to share?

Thanks for reading,

ms-houser

Professional Learning Binder

For the past few weeks I’ve been pondering how to support teachers in documenting, organizing, and reflecting on their work and learning done in coaching cycles, particularly the use of evidence and data in supporting student achievement.  I wanted teachers to have a lasting, tangible product to walk away with after the completion of coaching to support their future work.  After a conversation with my principal during which she suggested creating “Professional Learning Binders” with teachers, I thought this could be a great solution to my dilemma!

I envisioned teachers being able to use their Professional Learning Binders in a variety of ways.  First, as a model for how to organize other classroom assessments and data.  Well analyzed and organized data is so important in instruction, but many teachers struggle with the organization piece.  Using the Analyzing Assessments tool, the featured Monitoring Grid and a few labeled dividers can all help with this.  Additionally, teachers can use collected work in the Professional Learning Binders as part of a larger teacher portfolio.  Like other professionals, teachers need evidence of their growth and achievement over time.

Now with all that said, let’s have a look!
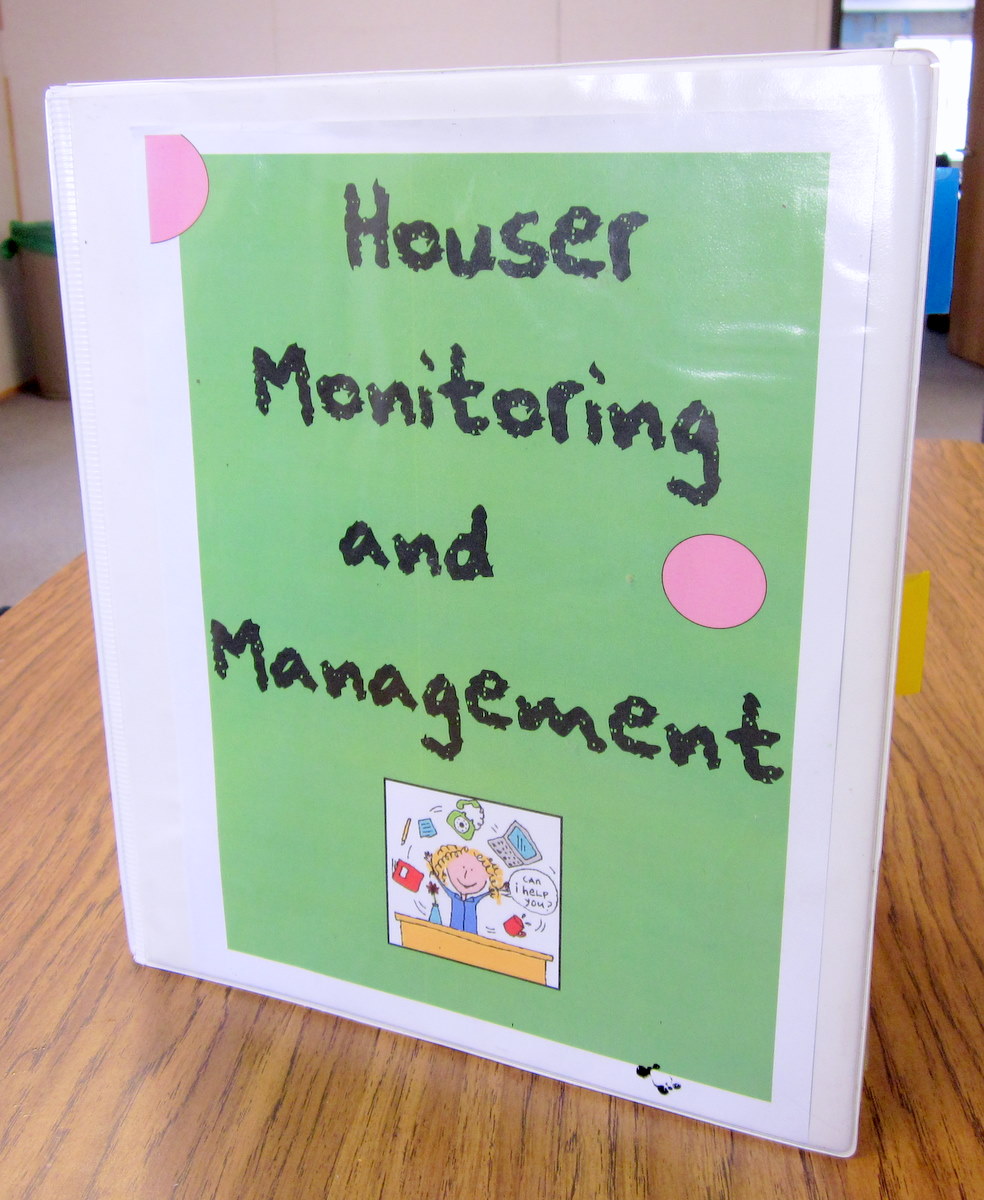
Binder Cover

***If you would like a personalized binder cover in the design featured here, send me an email and I will make one for you free of charge!

Front of Binder

Binder Spine

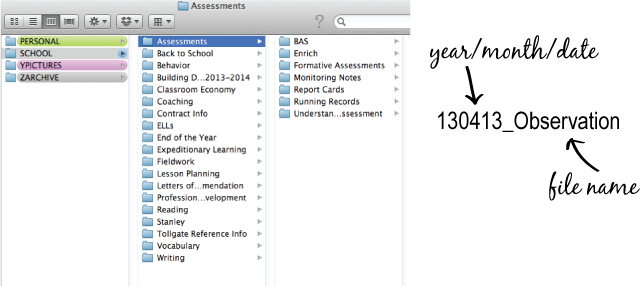
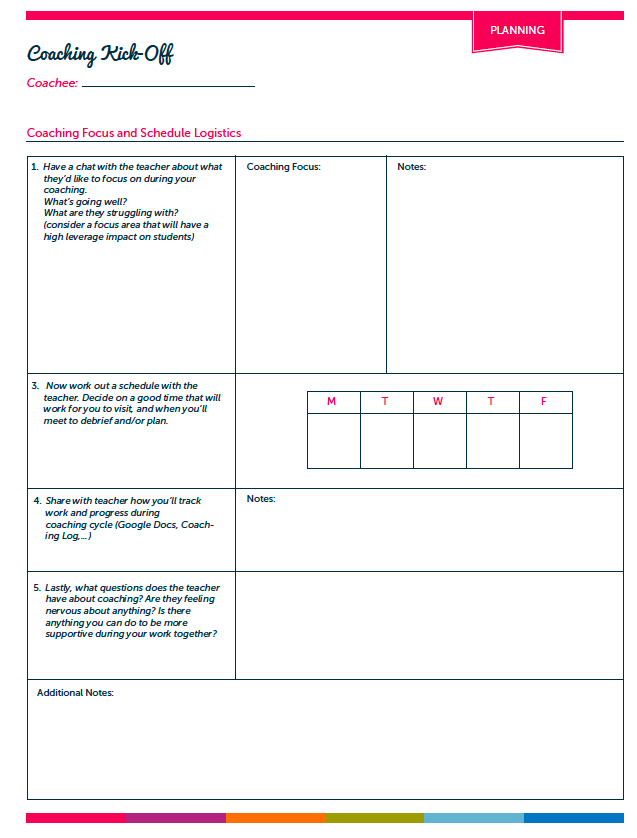
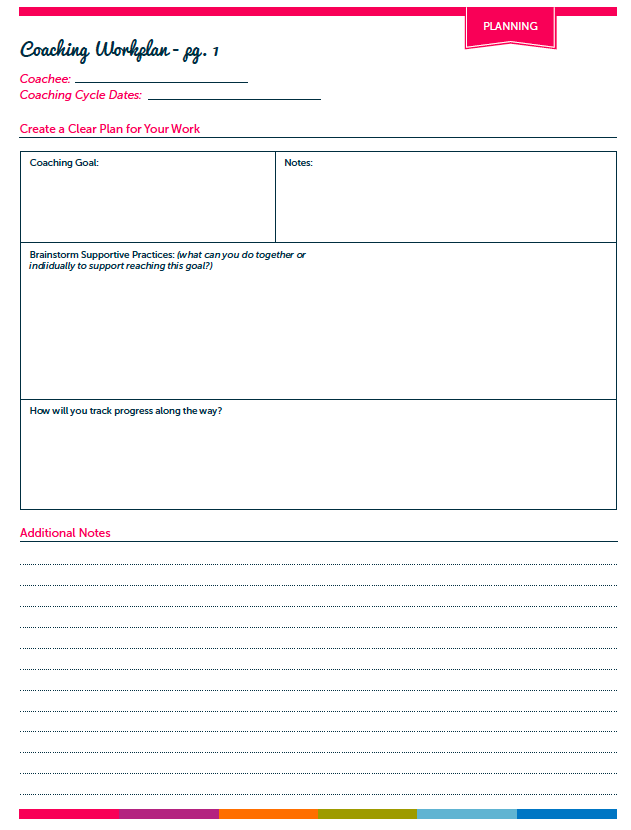
The first two tabs are labeled “Planning” and “Assessment.”  The Planning section includes documents that helped guide our identified coaching goal such as our school Work Plan and Expedition planning documents.   I also included a copy of our “Goals and Planning” page which outlines our student learning goal and if applicable, teacher learning goal.

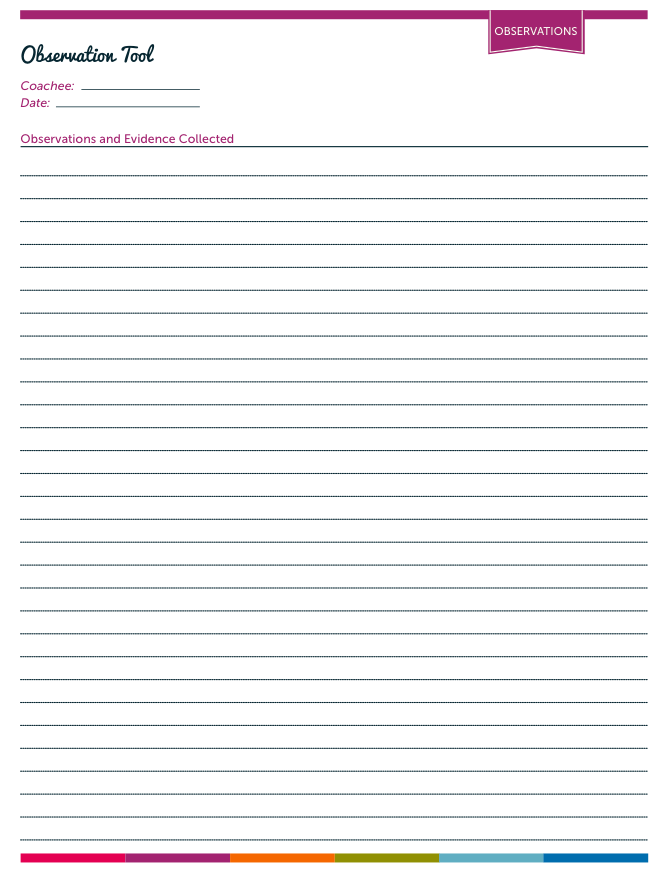
The Assessment section features collected assessments for each student divided by name labels.  There is also a Monitoring Grid included for each student.  You can use mailing labels to collect information on each student tied to identified learning targets.  Then at the end of the week, just peel and stick!

Click to Download a PDF of the Monitoring Grid

At the front of the assessment section is the Analyzing Assessments tool we used to organize assessment information into a data set to support us with planning.

Click to Download Analyzing Assessments Tool

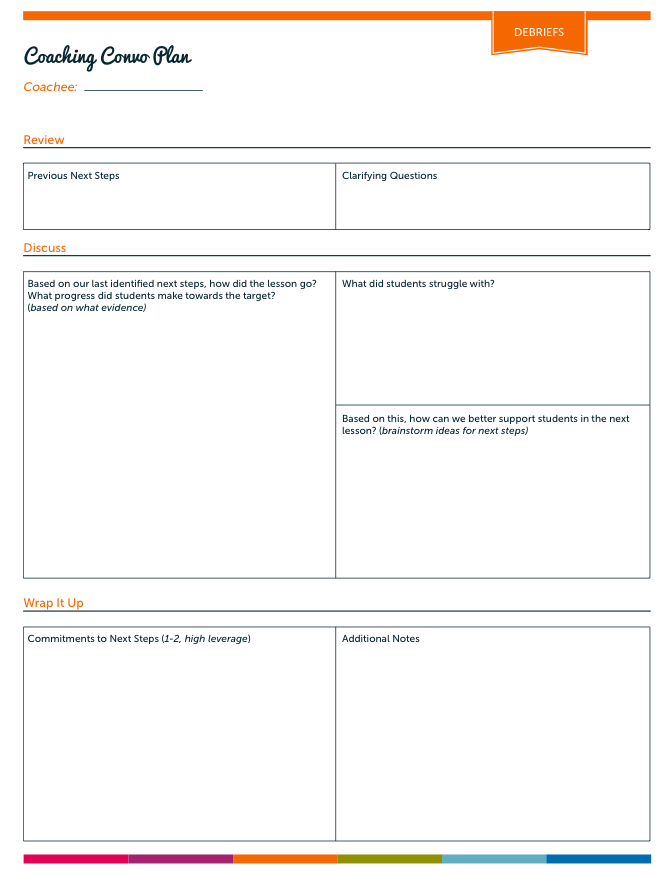
The last three tabs are labeled “Instruction,” “Results,” and “Reference.”  In the Instruction section I plan to collect a few example lessons that I observe and give feedback on during the coaching cycle.  After a post-assessment is given at the completion of the coaching cycle and we have data to show what progress was made, this will be included in the Results section.  Additionally, I plan to ask teachers to write a short reflection on their work done in coaching and their learning as a result which will also be included.  In the Reference section, I have included a few professional articles tied to our coaching goal as an additional resource.

This is a GREAT article by the way if you’ve been learning about Close Reading!  You can download it here.

I hope this post sparked your thinking for how you can support teachers in organizing and reflecting on important information tied to your coaching work.  If you are a teacher, hopefully this post gave you some ideas for how to begin a professional learning binder/portfolio of your own!

Thanks for reading,

Instructional Coaching Tools

Last week I shared the instructional coaching data tracker I use to help organize and reflect on my work in coaching cycles throughout the year.  In the post I mentioned that I use a variety of other coaching tools to document and organize work with individual teachers.  Here are a two of my most important.

Coaching Kick-Off Meeting

At the start of instructional coaching cycles, two of the most important things we can do as coaches is to establish a respectful and trusting rapport with our coachee and also show that we honor them as an adult learner. You can work to implement these two practices in part by setting up a Kick Off coaching meeting.  The first purpose of this time is to get to know your coachee as a teacher and learner.  The second purpose is to work together to identify a goal for your coaching cycle. In having this kick off coaching conversation, you are establishing yourself as a “thinking partner” who is there to learn along with them. Additionally, you are setting routines and norms for your work together and clarifying logistics, which I have found helps in preventing potential misunderstandings down the road. Creating an agenda for this meeting helps to ensure that your time is purposeful and action-oriented.

Instructional Coaching Tools

Download your FREE Coaching Kick-Off Printable Here

Coaching Work Plan Tool

This is a great tool to help you craft a plan for your coaching goals, how you plan to arrive at these goals, and the results of your work.  After the Kick-Off meeting, I set-up a Goal Setting meeting with teachers and use this tool to guide our conversation.  I’ll revisit it throughout the coaching cycle to ensure that our work is staying on track.  In the final coaching wrap-up meeting I have with teachers, we review and document the results of our work using this tool.

Instructional Coaching Tools

Instructional Coaching Tools

Instructional Coaching Observation and Debrief Tool

This instructional coaching observation form is my go-to tool for all of my coaching observations and debrief conversations.  I record our coaching cycle goal at the top to ensure alignment between learning targets and look-fors in the lesson.  The listed debrief questions always serve as anchors for post observation conversations.  As far as instructional next steps, one thing I have learned is fewer is better!  Ensure that the teacher you are working with has identified and committed to 1-2 instructional next steps they feel will support student progress, but also feel manageable.

Instructional Coaching Tools

Instructional Coaching Tools

Download your FREE Coaching Kick-Off Printable Here

And for the complete
Simplified Coaching Planning Kit …

Simplified-Coaching-Planning-Kit-cover-image

Talk to you soon!


Like what you've read?
Sign up for updates. It's FREE!

Manageable Monitoring Part II – Nifty Note Cards!

In my last post I wrote about one of my top two ideas for making monitoring student work and thinking more manageable.  In this post, I will describe my second manageable monitoring system.  I came across this idea while reading, “Making the Most of Small Groups: Differentiation for All” by Debbie Diller.  Being a huge fan of teacher organization tips and tricks, my attention shot straight to Debbie’s section on getting organized.  In this section she shares some of her thinking on using note cards as a monitoring tool.  I put her ideas to action in monitoring my students as readers and I also began using note cards for monitoring in writing and math.

Note Cards in Literacy

What will I need?

  • 3×5 white note cards (this helps me distinguish literacy notes from math notes), one for each student
  • 5-6 pocket dividers (different colors to indicate small groups, see below for clarification)
  • One divider for each student in your classroom (coordinate the color with their small group instruction color, see below for clarification)
  • One 1.5 inch binder (or larger if you anticipate needing more space)

How do I put it all together?
Before you put your literacy monitoring binder together, you will need to first put your students into flexible small groups for differentiated instruction.  Once you have done this, give each student a color divider and put them behind the same color pocket divider for that group.  You can put a few sheets of notebook paper behind each student’s divider tab to take running records for miscue analysis.

What do I do with the note cards?
Assign one note card to each student.  I use one side for anecdotal reading notes and the other side to jot down notes about their writing.  You can keep these note cards in the pocket of your pocket dividers.  If you decide to switch around your groups, note cards make it easy to do so.

When you meet with your students for reading groups, simply take out the note cards for students in that group and place it in front of each reader so that it is ready for recording observations.  This also makes it easy to see who you have made several observations on and who you haven’t.

Other thoughts
You can store your lesson plans for groups in or behind the pocket divider.  I also like to keep informational sheets with ideas for strategy instruction in the front of my literacy monitoring binder.

If students are involved in an expedition (long term unit of study), you can also keep your learning targets for that expedition in the front of your binder to keep your monitoring on track.

Note Cards in Math

What will I need?

  • 3×5 colored note cards (3 packs to start should get you through a couple of units)
  • Clipboard

How do I put it all together?
It’s super easy.  First, write each student’s name on the bottom of a note card tape (see below).  Next, tape them to the clipboard (start at the bottom of the clipboard and work your way up).  Try to keep them all the same color if you can.  You can use colors to help distinguish the unit you are taking monitoring notes on. I use a sticky note to jot down the look fors of that day’s lesson and put it on the clipboard.  This helps guide my focus.

You can also use these note cards to record observations you make in number talks, independent station work, small groups, or any other area of your math block.

Storing and Using Note Cards

Now that you have been busily using monitoring notes as an informal assessment in your classroom and your note cards are filling up, you want to put them somewhere safe where they’ll be easily accessible for future reference.  All you need is a 4 x 6 inch card file!  Store note cards under students first or last name.  The white note cards for literacy monitoring and colored note cards for math monitoring will help you keep things straight.

When you’re ready to do report cards or are preparing for conferences, just whip out these nifty note cards and you’ll be good to go!


Manageable Monitoring Part I – Portfolio Power!

Last week I had a conversation with a second grade teacher who was wondering about how to setup a manageable monitoring notes system.  This is not the first time that a teacher has come to me to inquire about this and certainly not the first time that I have wondered about it myself!  Before I continue, let’s clarify what exactly monitoring notes are.  From my perspective, I see monitoring notes as a type of informal assessment that helps to document student learning and guide further instruction.  Furthermore they are seemingly simple, yet deceivingly tricky.  I mean, all you need to do is jot something down on a sticky note and stick it on a binder or on your desk for later right?  Well, not really.  That one sticky note or piece of paper can quickly turn into several and before you know it you don’t know which is which or what is where.  Agh!  When this happens, you quickly feel frustrated and wonder what the point of this whole monitoring thing is anyway. Well it definitely has a point.  They not only serve as a documentation and planning tool, monitoring notes also play a key role when completing report cards, having high quality conferences with families, and in building a thorough body of knowledge in tracking student growth.
Each year, I have worked on revising and adjusting my monitoring system to make it more effective.   In this post and the following post I will share my top two manageable monitoring systems.

Portfolio Power!

Around my second year of teaching I began to wonder…”Wouldn’t student portfolios be cool!?  I could use them to house and organize my monitoring notes, other assessments, and even pieces students have selected themselves to show their best work!  Oh, and I could even use them for student lead conferences!”  Well while I had big dreams, putting these portfolios together seemed like too daunting of a task and I just couldn’t deal.  At least not that year.  The following year I figured out how to put it all together.  Check it out!

What will I need?

  • one 1-inch binder for each student (if students didn’t bring them in with their other back-to-school supplies, I found them for $.79 each at WalMart)
  • three dividers, one for each of the main subjects you teach (reading, writing, math) — I especially like the pocket dividers as you can use them to store other assessments
  • three pieces of construction paper, cut to size (matching the colors with the dividers keeps it even more manageable!)
  • mailing labels (I prefer the sheets that have three columns of labels)

How do I put it all together?
Label the dividers and put the corresponding construction paper folder behind them…done!

What do you do with the mailing labels?
The labels are where you will take your monitoring notes.  You will need one sheet of labels for each subject you are monitoring.  Write each student’s name on the labels for each subject (you can even use pen colors that match the construction paper color you’ve designated for each subject).  I then put these label sheets on a clipboard, dividing them with stick on tabs so that they are ready for monitoring.
What are you monitoring for? 
The majority of your monitoring notes should be based on specific look fors tied to learning targets you’ve set for the lesson.  Monitoring in this way helps to focus your attention and guides next steps. Of course, other note worthy observations not connected to the learning target you make while working with students can be recorded too.  As you continue to take notes on students, you can quickly see by looking at your monitoring sheet who you have met with and who you may need to check in with.
As your monitoring notes fill up, place them on the construction paper inside of student binders.  What will result is a growing bank of knowledge about students in each academic area that you can use to track and report progress.

At the end of the day or the week, try to set aside a time to review your monitoring notes and use them to make adjustments to your lessons.   Informed instruction = better instruction!  Take the time to make monitoring student work more manageable for yourself and I’m confident you’ll be happy that you did.

As always, let me know if you have other good ideas!

Kristin