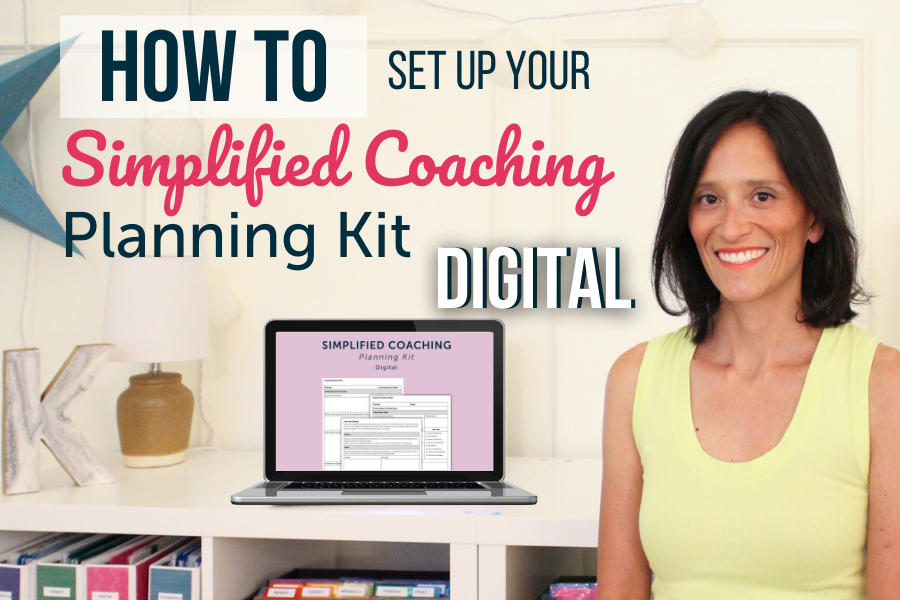
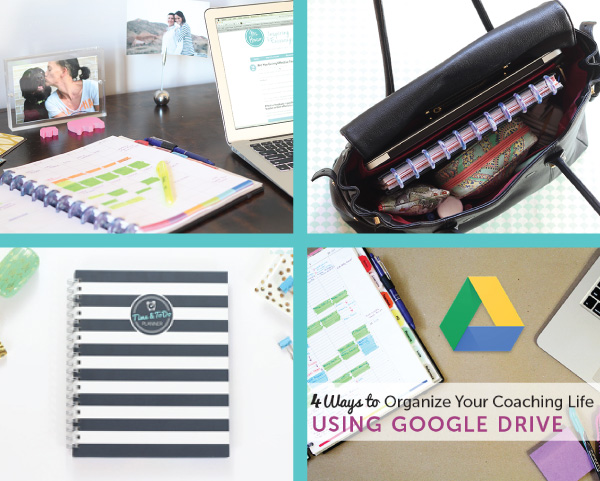
Do you have a good system in place for organizing your DIGITAL instructional coaching tools and resources? Let’s talk through how to get your digital coaching life organized.
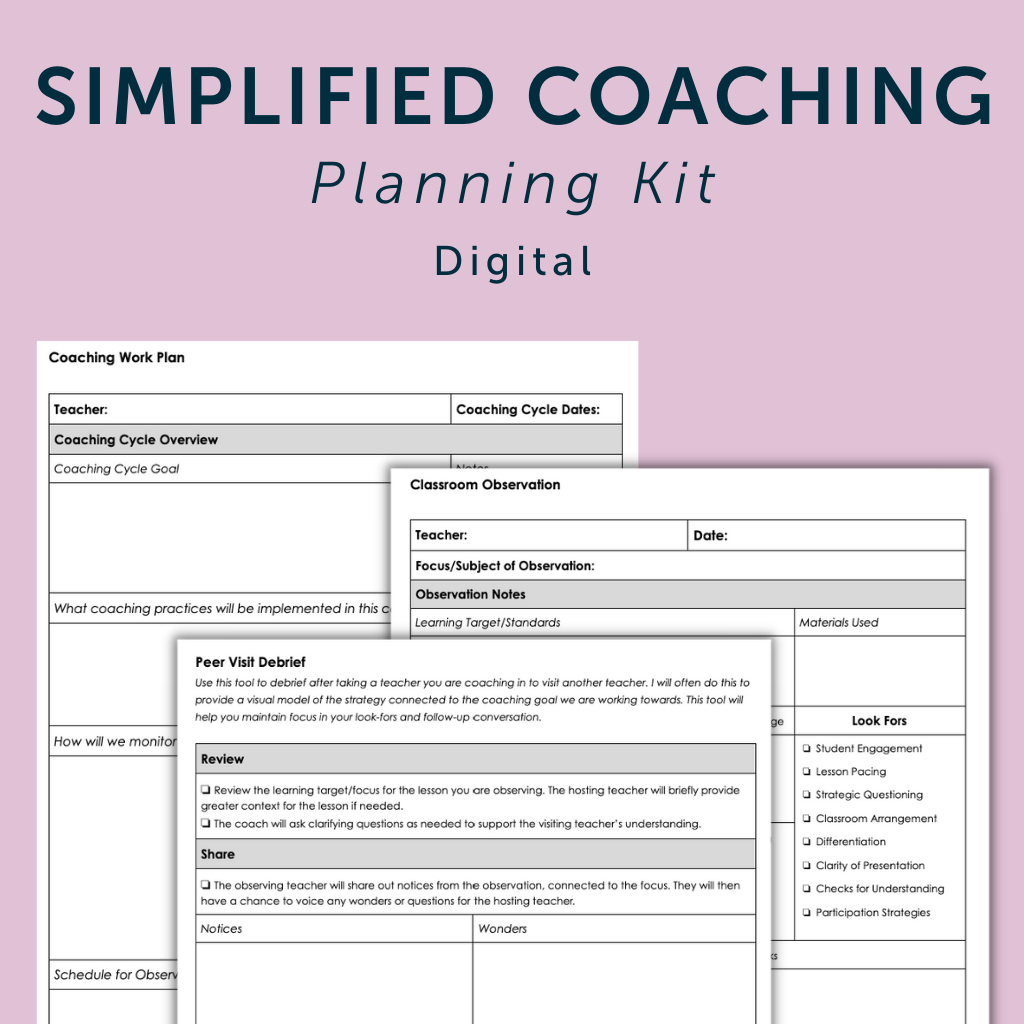
One of my most used coaching resources is my Simplified Coaching Planning Kit. I have used this paper based coaching kit for years now, and will continue to do so.
However, there is also a digital component to our work and planning as coaches, that needs to be attended to. Also, some of us just have a preference for digital based tools rather than paper. I get it!
This year I set up a digital extension of my Simplified Coaching Planning Kit in GoogleDrive, that I’m excited to share. Let’s take a look at my set up process.
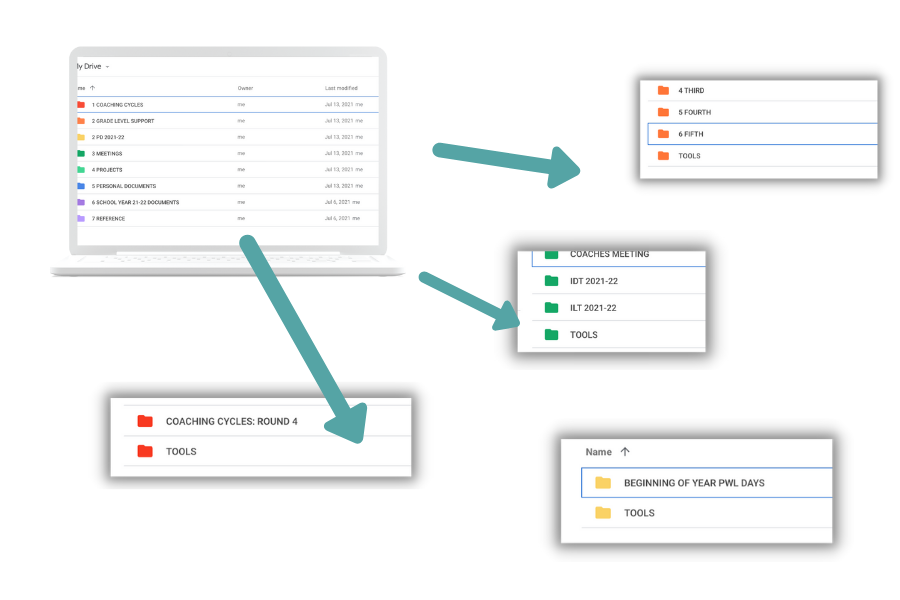
How to Organize Your Simplified Coaching Planning Kit (Digital!) in Google Drive
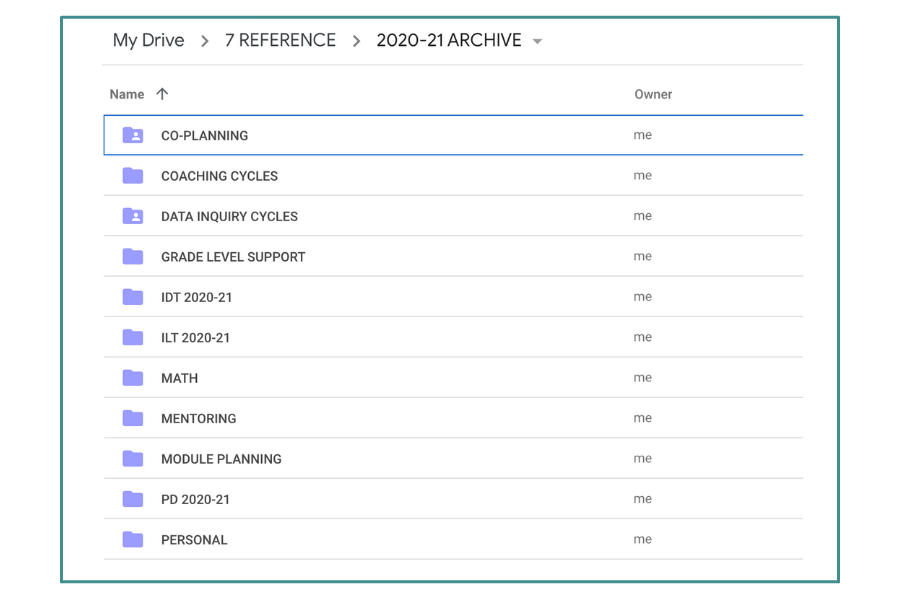
1. Delete and Purge
First. The big delete and purge.
Go through all your digital files from the previous school year, and delete anything you didn’t end up using or know you won’t need going forward. We can think of this as digital clutter. Out it goes!
Everything else can be archived.
At the end of the school year, I create an archive folder for that year. Within the archive folder, I set up sub-folders so if I do end up needing to reference anything from previous years, I can quickly find it.
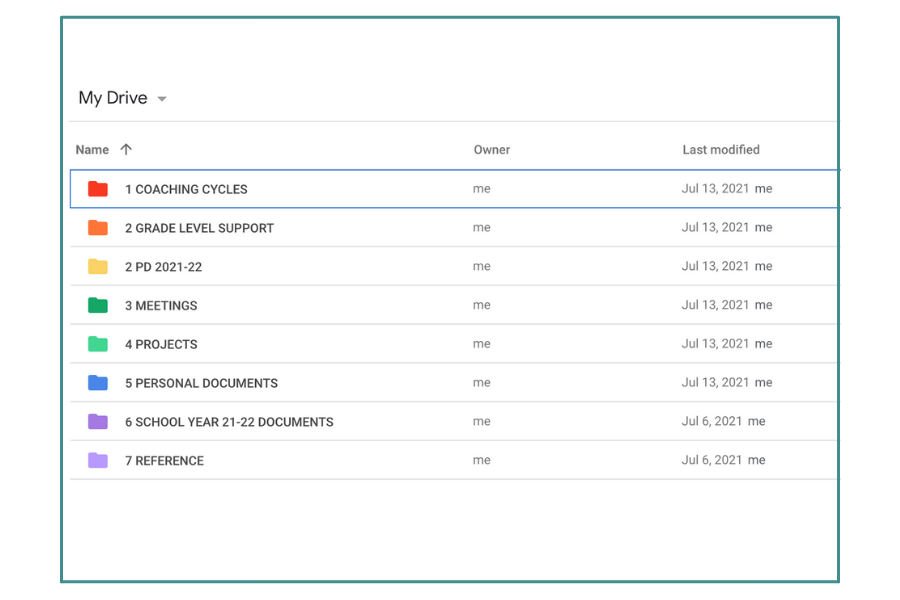
2. Create and Name Your Main Category Folders
Next up, I created my main category folders. I was intentional in “matching” these category folders to the sections I have in my paper-based coaching kit. This allows me to work flexibly with both components of my system.
A few notes:
I have enough folders to organize the different areas of my work, yet not too many.
Color coding support with visually distinguishing between categories, and it just looks pretty :)
I added numbers to the front of each folder title, to order my work, based on priority and importance for my coaching role.
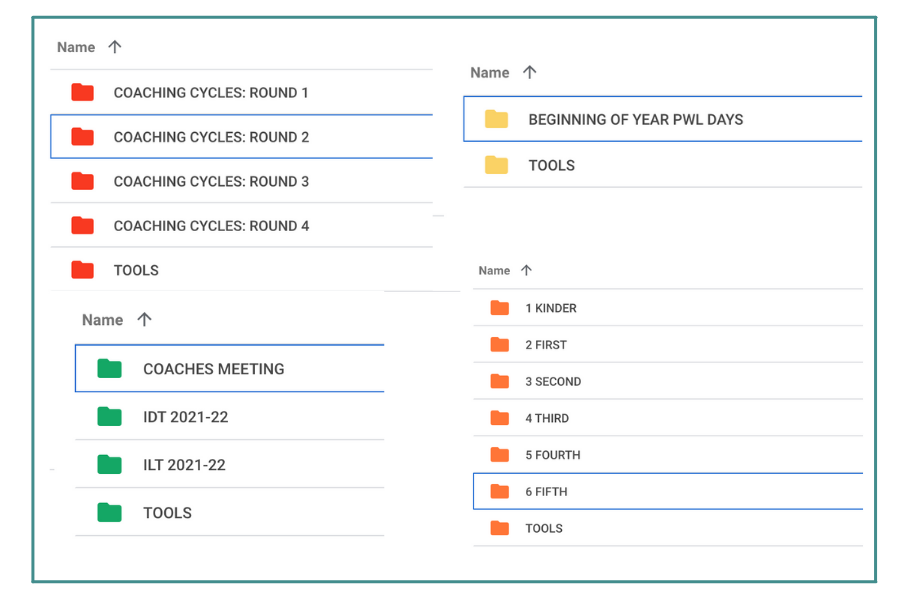
3. Create and Name Your Sub-Category Folders
I use sub-categories to keep my main category folders organized.
For example, I break my main coaching category folder into different folders for each round of coaching I expect to do throughout the year. Then within each of these folders, I will create a folder for each teacher I will be working with.
I also like to match my sub-category folder color to the main category color.
4. Create a Tools Folder
OK, this is important. Make sure each of your main category folders also includes a “Tools” folder.
This is where you will house all of your coaching forms and planning tools as templates.
One of the best ways to really “get” good teaching, is to see it in action.
You can listen, learn, or read about what it’s supposed to look like all you want, but it doesn’t really click until you actually experience it — teaching that has a bang and makes a difference.
As I’ve shared in the Coaching Workshop, that’s one of the reasons why I think model lessons and classroom visits can be so impactful in building foundational understandings of teaching strategies, that you can then work with teachers on implementing themselves.
Now, when you can make this happen for a group of teachers, support it with a visual of the lesson plan beforehand, link your look-fors to specific teacher moves, follow-it up with a descriptive review protocol, and add in teacher commitments to next steps…well, then you’re really talkin’!
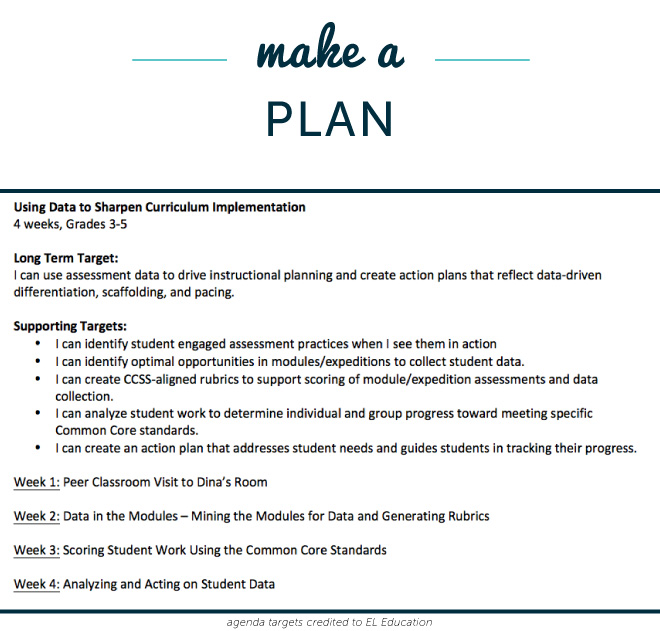
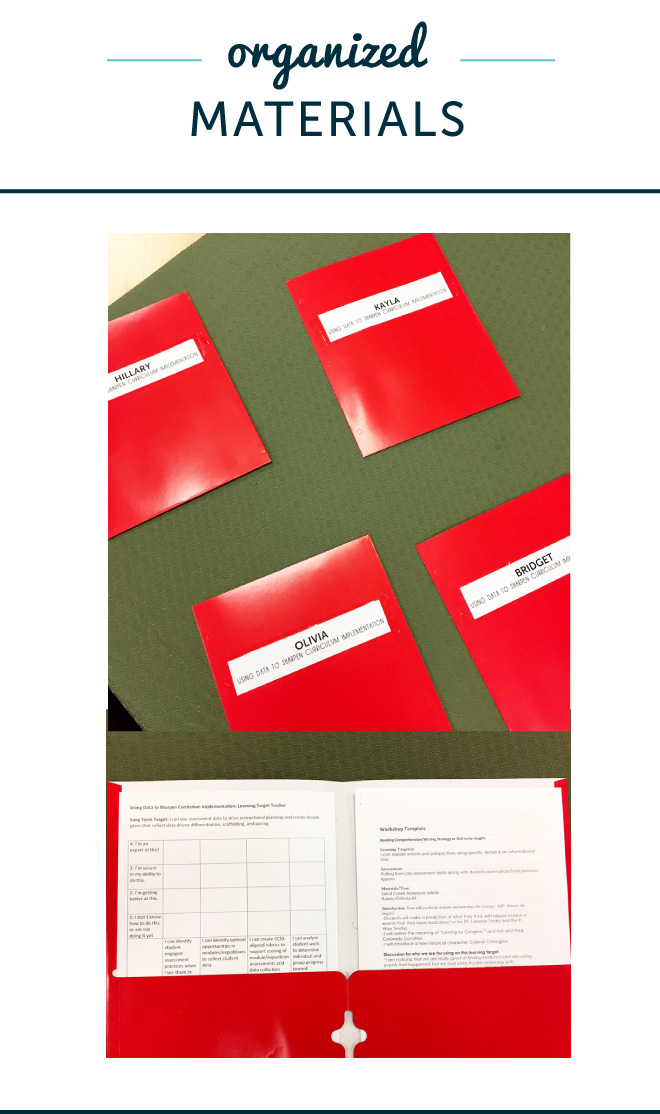
This week I wrapped up a 4 week “deep dive” PD with our 3-5 teachers during which we learned about “Using Data to Sharpen Curriculum Implementation.”
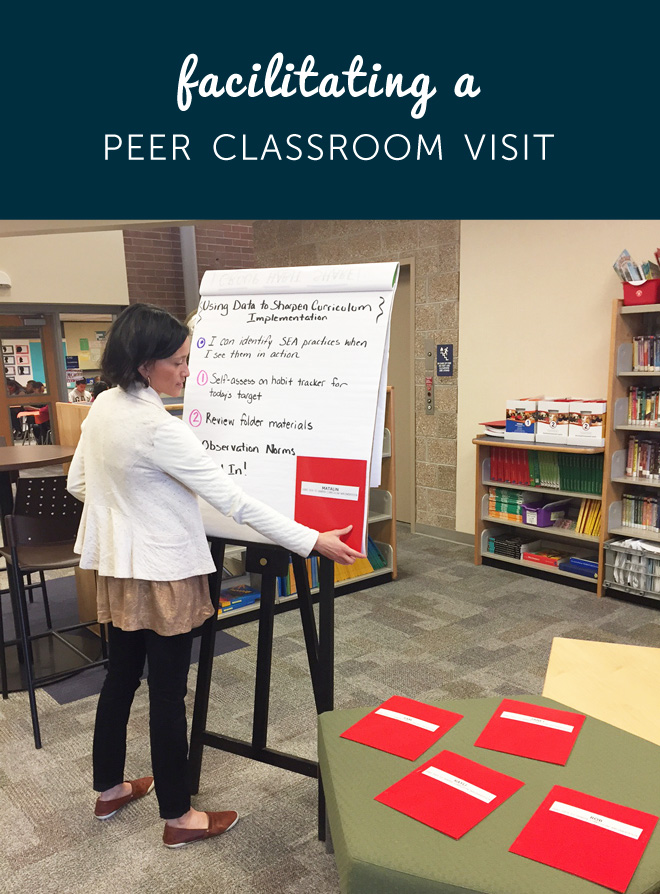
It’s been pretty awesome, and I credit much of its success to our Peer Classroom Visit Kick-Off.
Let’s walk through the plan of action, shall we?
First things first. Start with your final outcome in mind, and plan backwards from there.
Here are some questions to consider:
What is your main goal/purpose for arranging this visit?
Will this lead into a sequence of follow-up PD sessions?
Will this visit support individualized coaching goals?
Will this visit kick-off a grade level coaching cycle?
Next up – recruit. Here’s who you’ll need:
OK, sweet. Now that I had the WHO all set-up, I needed to get my materials organized.
Knowing that the purpose of this classroom visit was to “kick-off” a series of future PD sessions, I wanted to help teachers stay organized with all the materials I would be giving them over the course of the next 4 weeks. Plus I wanted to spruce things up a bit, and help it feel more like an “experience” for teachers.
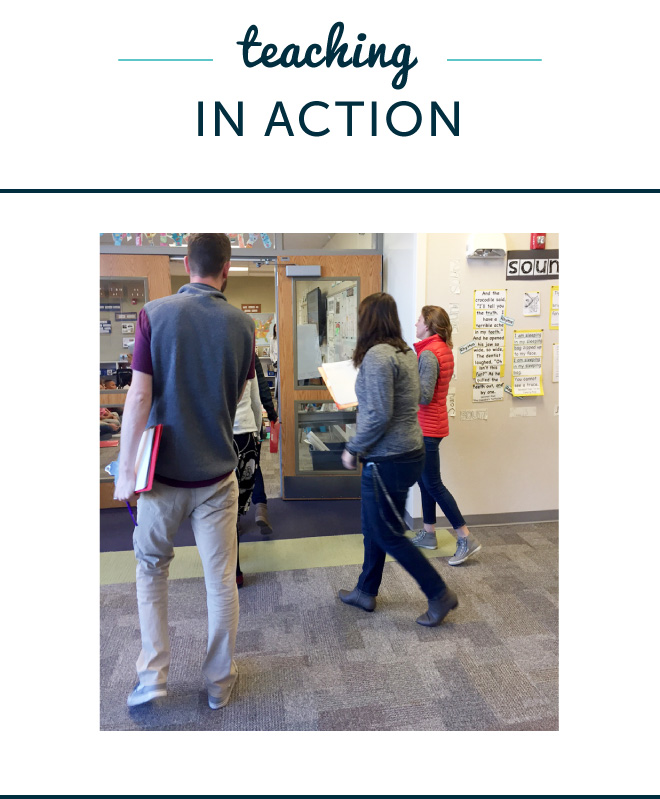
So I made a folder for each teacher, which greeted them on the morning of the visit. (logistics note: our Assistant Principal got coverage for all 12 teachers on this morning, so we were all able to go in together!)
After a pre-brief with teachers (overview of the Learning Target, self-assessment on target tracker, review of materials and observation norms), we were ready to head in!
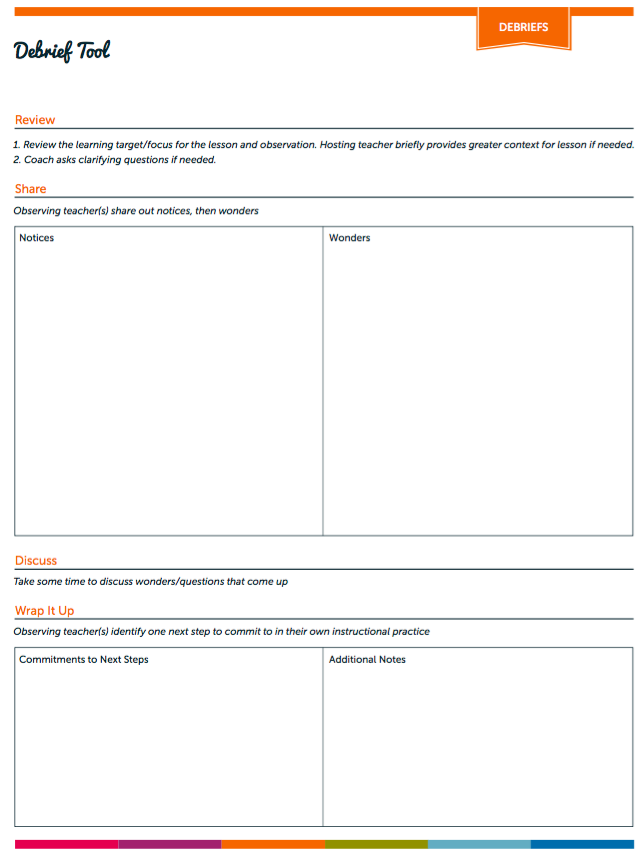
Since teachers had to head back to their classrooms straight after the visit, I arranged for a follow-up debrief later that week.
There’s a lot of different forms/protocols you can use to structure a classroom visit debrief, but here’s one that can be found in my Coaching Kit.
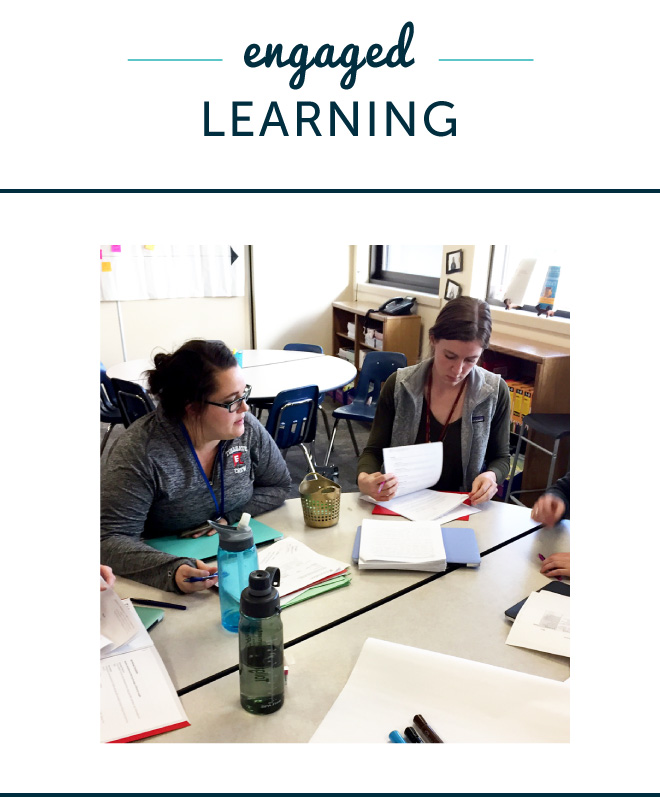
Now coming back to the original purpose of this particular classroom visit…as I mentioned earlier, the learning that took place in observing Dina’s lesson was intended to kick-off a series of 4 follow-up PD sessions. The host of the visit, Dina, supported in facilitating these sessions and helped teachers apply the different pieces we had put into place around assessment to arrive at the tightly planned lesson they observed (logistics note: Dina is a teacher who I’ve coached actively this year. She was well prepared for the visit and the instructional practice we modeled for teachers.)
I’ve actually never set-up PD in this way, but I found that teachers were really engaged in the work and learning as a result of seeing it in “action.”
And there ya have it! Hope this post provided some inspiration for you as you think about organizing classroom visits within your own school to support teacher learning.
Thanks for reading!
P.S. Bonus tip: Listen to fun music when you plan. Sometimes I’ll even turn some tunes on for teachers at the start of PD! This one will get you feeling “Good as He**!”
P.P.S Excited about this year’s TTP?! (Time & ToDo Planner) – get signed up here for updates. Cool new cover design, binding, and….a folder this year! You won’t want to miss it.
Have you ever had one of those years at school that’s just been a bit…tough? This has been one of those years for us.
We’ve been working through some changes and challenges in leadership, that have left us all without a solid foundation to stand strong on, and just not our peppy selves.
As a coach, when you notice a dip in staff culture and morale, what can you do?
When I asked myself this question, I thought…well…hmm…what is something I’m pretty good at, I enjoy doing, and I know will help add some pep to our teacher’s step?? Think, think…I got it!
Creating beautiful spaces.
Working and learning in an inspiring space is something that makes us all feel good.
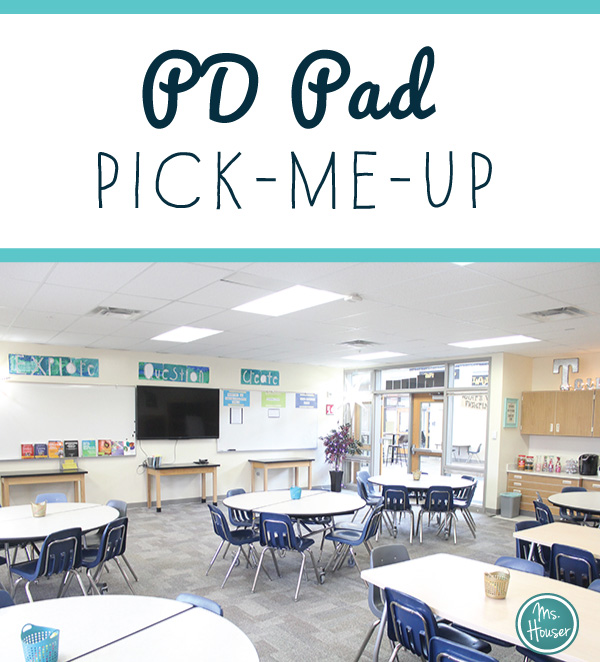
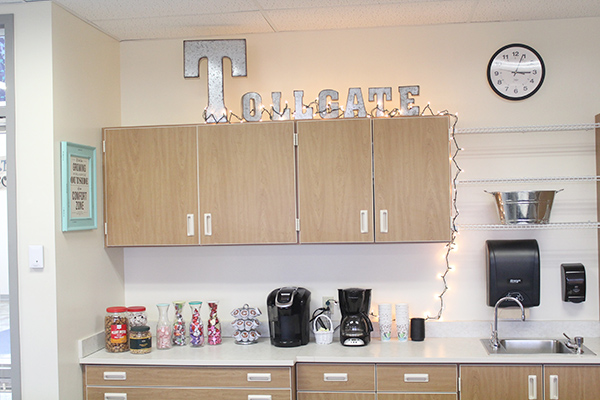
And where do we learn each week? The PD Pad!
So the designer in me stepped in and said, “Let’s do this.”
These past few weeks, using spare chunks of time, I’ve been chipping away at project: “PD Pad Pick-Me-Up”.
Alright, let’s take a tour, shall we? Come on in!
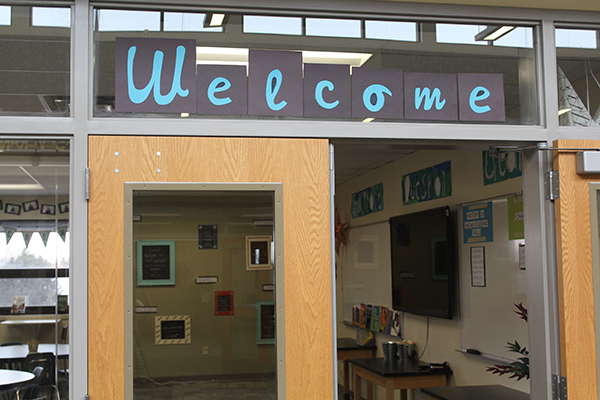
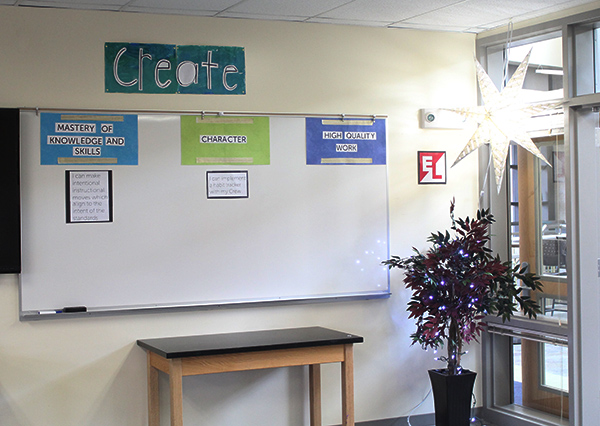
I made a Welcome Sign to greet teachers as they come in. I printed “Welcome” using a fun font on a turquoise background, cut out the letters, and matted them on different size sheets of black construction paper.
As you come in the room, to your right, you’ll see the three categories of our Work Plan Goals posted. Below those, are the Learning Targets guiding our work in PD. Some foliage always helps to liven up a space, so I got the plant in the corner at Hobby Lobby (not real, but still leafy :) and wrapped it in string lights. The star hanging above it is from Ikea. Lighting is one of those design pieces that can help take a room from drab to fab.
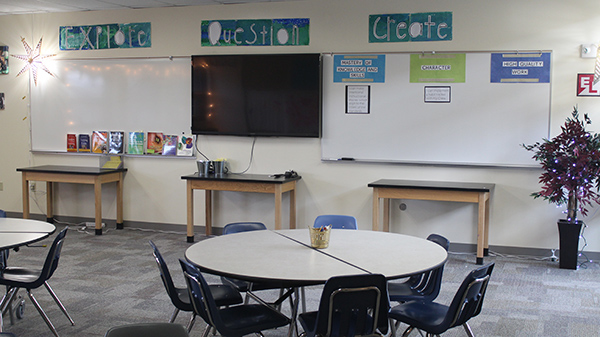
“Explore, Question, Create” are the three words that make up our school’s vision. So I knew I wanted these posted front and center. I asked a kindergartner to help me write the letters for the words, then backed them on a painted construction paper background that our art teacher had the first graders help her with.
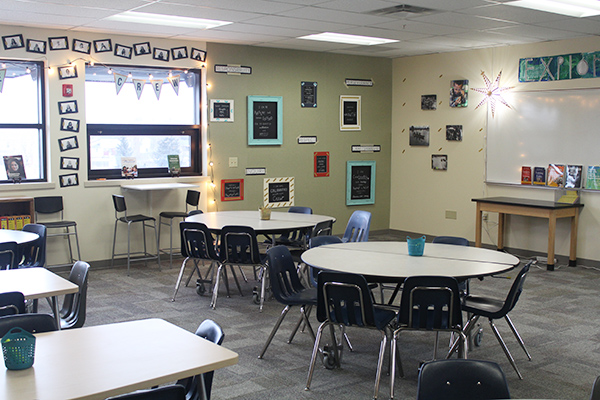
OK, let’s take a look at the far side of the room. I love this corner of the space! Photos of students, and our character habits posted on the wall help anchor the room in the importance of the work we do everyday.
Oh, and you’ll see each table has a plastic basket to hold sticky notes, highlighters, and pens. I didn’t like the original colors the baskets came in, so I spray painted them a fun turquoise and gold to go with the color scheme of the room.
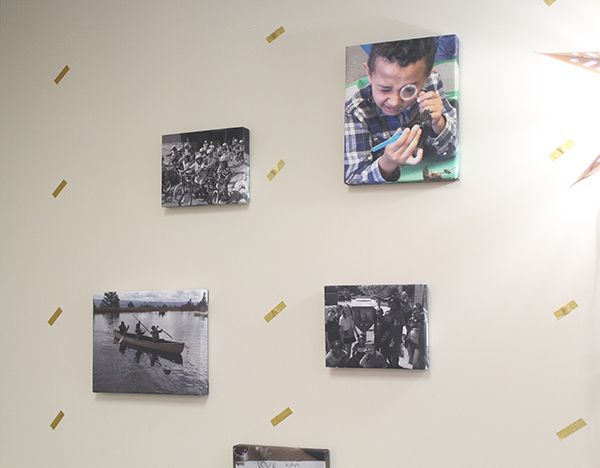
Here’s a closer look at the student photos. I wanted them to stand off the wall a bit, so I had canvas prints made at Walgreens.
On the wall, I added a smidge of color with gold strips of washi-tape. This also helped me cover up some ugly holes in the wall :)
Here’s our Habits wall. I made some DIY frames, then used white chalkboard marker on a black tag-board background to hand letter our staff norms connected to each of our Habits.
Above each of the three windows in the room, I strung the words “We Are Crew.” As an EL Education School, this phrase is really important to the work we do. To highlight it a bit more, I strung some bistro light strands right above.
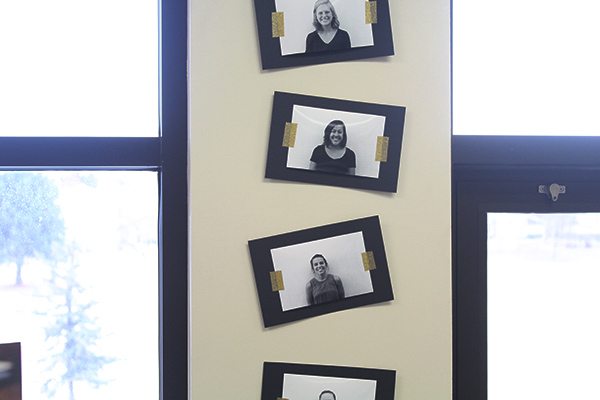
As a teacher, I would always hang photos of students in the room to help illustrate that this was our space. And as a coach, I like to do the same thing. Black and white photos of each of the teachers, matted on a black background, with gold washi-tape, felt just right.
On the other side of the room is our snack station. It’s hard to add some pep to your step in an after school PD without snacks and caffeine :)
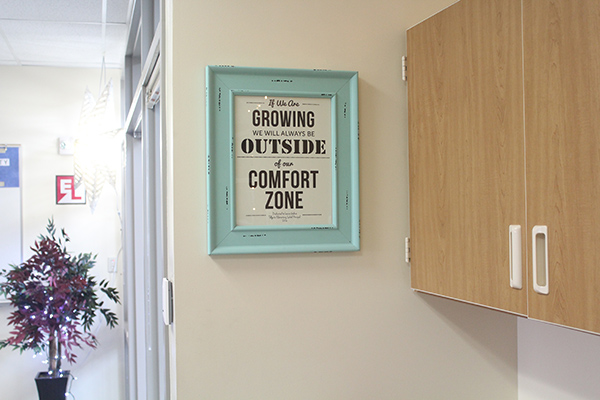
I designed this typography poster for a bit of motivation as teachers grab their snacks.
And there you have it! Hopefully this post gave you some ideas for how you might work to create beautiful spaces in your own building(s).
For more ideas and inspiration, here are two past PD Pads you can check out:
And lastly, if you’re going through challenges of your own at school, don’t worry. They happen to all of us. Just remember, teachers need you as their coach to stay strong and positive. You got this!
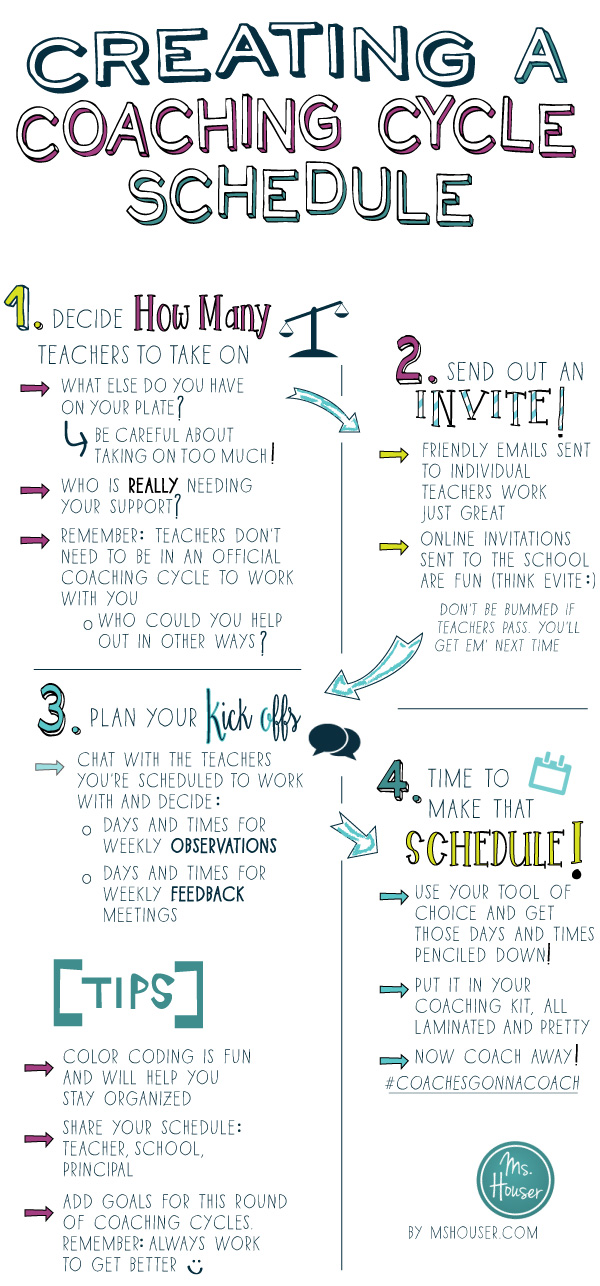
Earlier this week, I broke out the cool new pens I got for Christmas and got to work on putting together my coaching cycle schedule for this next quarter.
Creating new schedules throughout the year is a cool opportunity for us coaches. It’s kind of like having a mini beginning-of-school-year kick off more than just once :)
You get to reset and regroup for a new journey ahead with new “students” to motivate and move forward.
I know that sometimes creating a coaching cycle schedule can feel overwhelming, so I wanted to share the steps I use to simplify the process a bit and make it fun.
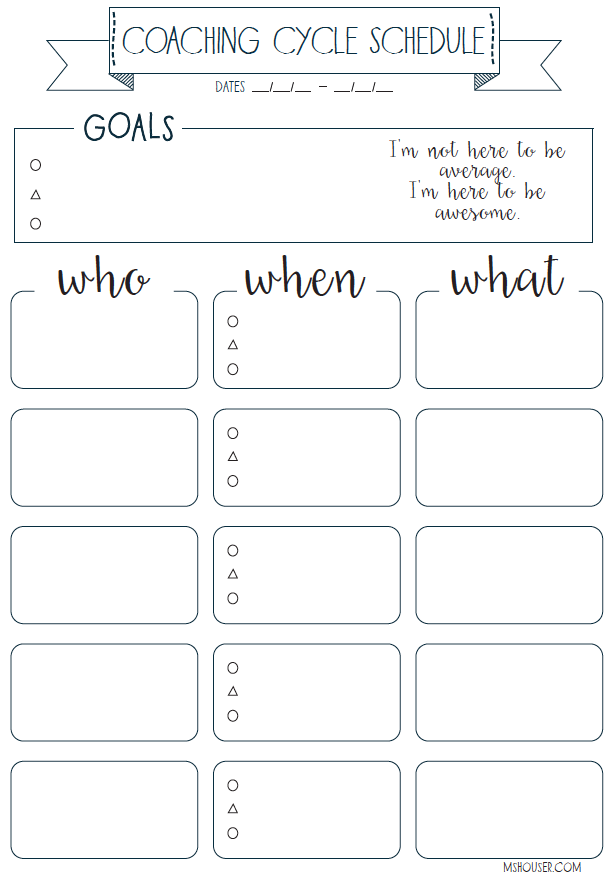
OK, now that we’ve got those steps and tips down, grab yourself a nice bright sheet of white paper and head over to the printer. I just designed a new Scheduling Tool I want to share with you.
It’s simple, fun, and includes space at the top to jot down a few goals for your upcoming coaching cycles. And because I think quotes are cool and inspiring, I included one of those too :)
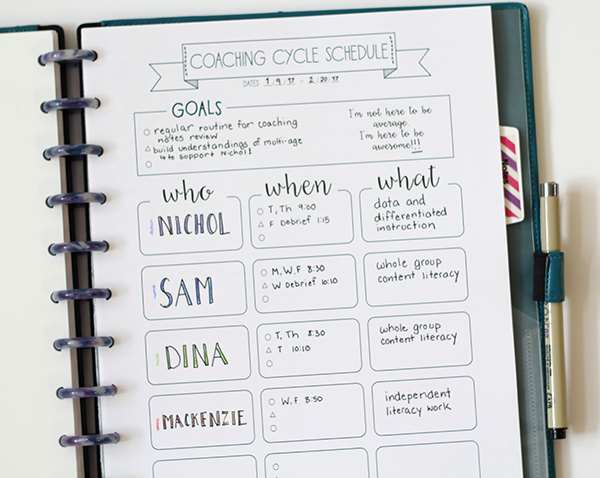
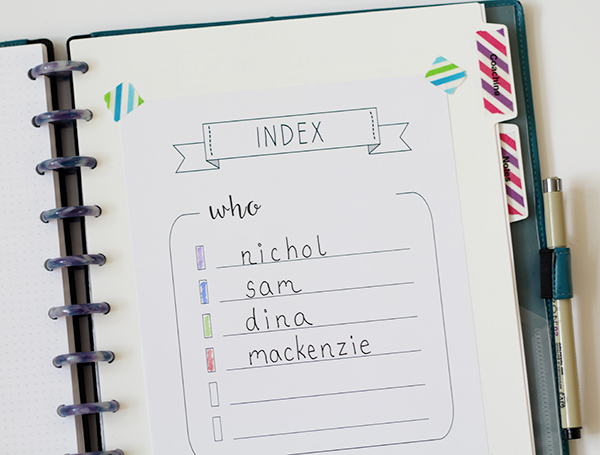
Once you have it printed out, you can pop it in your Coaching Kit. I like to put mine front and center, along with a color coded index of the teachers I’ll be working with. You know me and color coding :) The colors help me quickly find the different “sections” for teachers. So when I head into a classroom, I can just whip my Kit right open to that color.
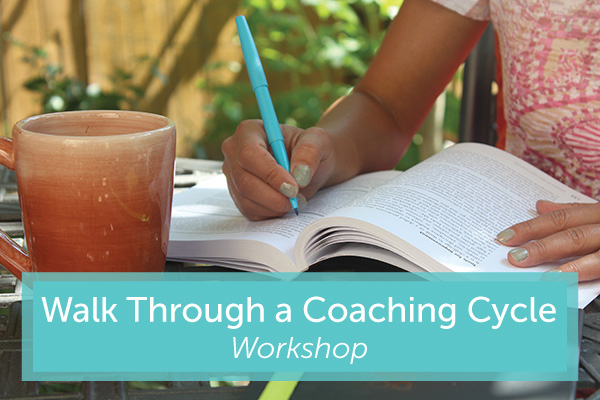
Want to learn more about how I work through coaching cycles? Check out the Walk Through a Coaching Cycle Workshop, where we walk through a full coaching cycle together.
I’ll also help answer some of those logistic questions that come up:
How many teachers do you work with during your coaching cycles?
How many observations and feedback meetings do you schedule x week?
Do you always set-up face-face feedback meetings, or do you use email at all?
Here’s what Nancy C. had to say about her Coaching Workshop experience:
“First of all, I want to tell you that I absolutely LOVE your documentation and your videos! What a fantastic package you’ve put together. This is only my second year as a Literacy Coach so I’m really just learning as I go along and your clear and concise way of explaining the coaching cycle is EXACTLY what I needed. I cannot thank you enough.
Here we go Coaching Cycles, here we go!! Whoop whoop.
Alright friend, I’m feeling really good about this second half of the school year. If there are any other topics or resources you’d like me to share heading into this year, be sure to let me know!
The kids have arrived! And it’s been fun, fun to see how excited everyone is to be back at school. The school is looking pretty good, and teachers are getting back into the routine and flow of our school days. But last week was a different story! Everyone was hustling to get classrooms set-up, first week plans figured out, and the school overall ready to greet kids for the first day.
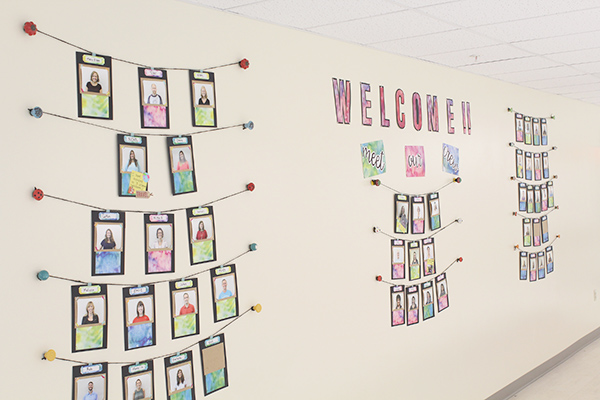
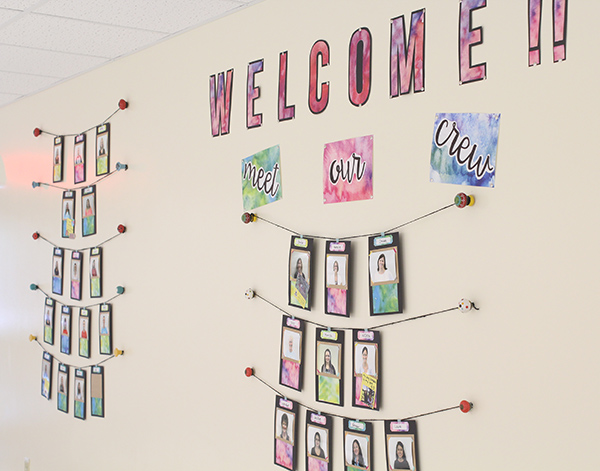
One of the hustle projects I worked on was DIY-ing a Creative School Welcome Wall. It’s a project I’ve done for the past few years, and each year I think about how to do it a little differently. This year I was inspired to create a cool watercolor theme, and was super psyched about the result.
A school welcome wall is a terrific way to add some positivity and beauty to a school environment.
In case you’re thinking you might like to work on a School Welcome Wall yourself, here are the steps I took to create ours.
1. Choose a Space
You can go big or small with the space you choose, but I’m always about bigger can be better when it comes to designing showcase boards/walls such as a Welcome Space. With this particular wall, I’m introducing our staff so I wanted to get as creative and artistic as I could in doing so. And for that, I needed a bigger space.
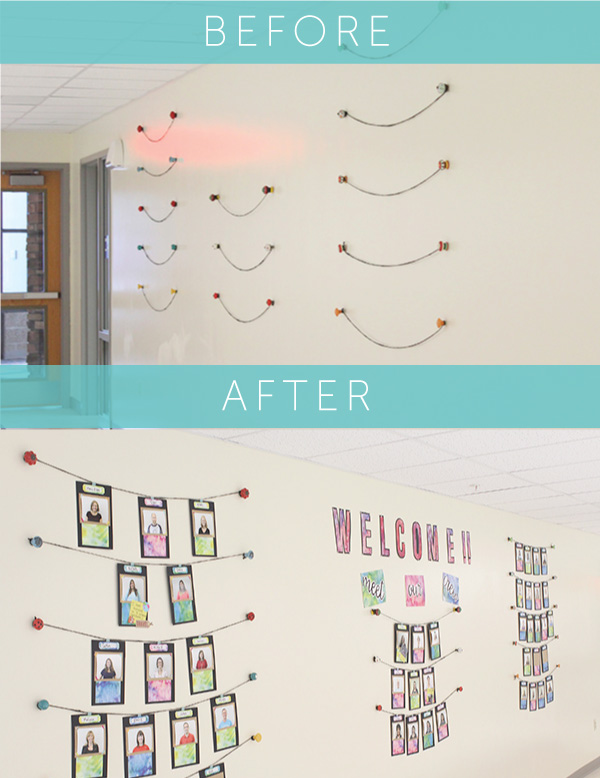
At first glance it was just a plain white wall, that I could have stuck a few photos to and called it good. But that just wouldn’t be my style.
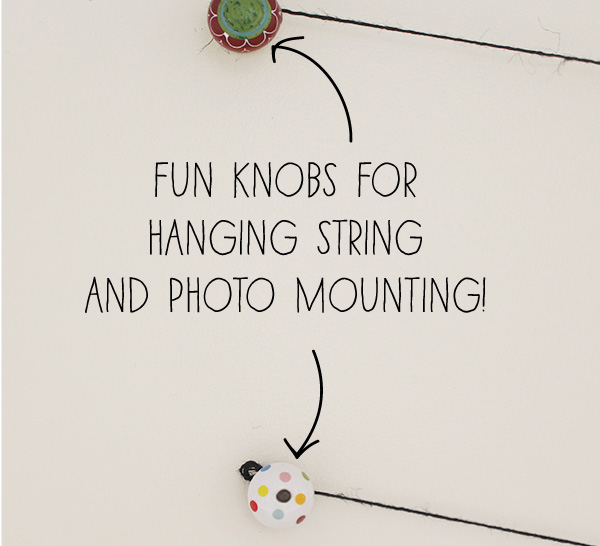
So I fancied it up with some cool cabinet knobs that I found at Hobby Lobby. I asked our custodian to help me drill them in, then I had the perfect photo hanging accessory. A little black string tied from knob to knob, and voila! I’ve just created the perfect space to work with.
2. Take Some Photos
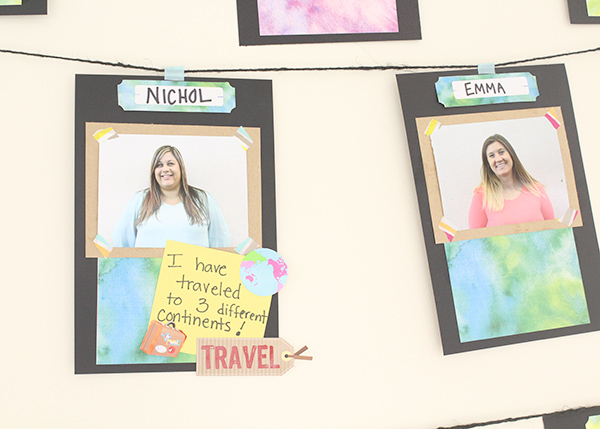
Next step – photos. I grabbed my camera, chose a consistent neutral background, and snapped away during a staff meeting break. That way, I had all 35+ staff members in the same location, and didn’t have to spend a ton of time tracking everyone down.
3. Gather Your Materials
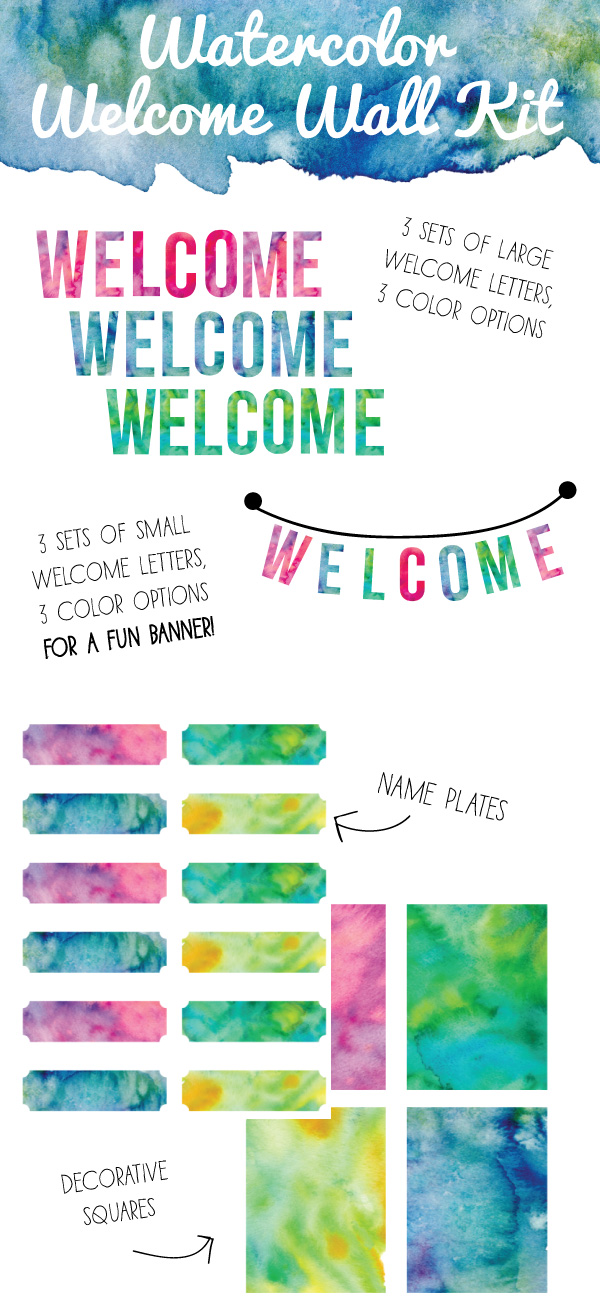
Ooo, this was the fun part. I started by designing the watercolor “theme” I was going to go with, which included a Welcome sign, name frames, and small squares to serve as a backing for each teacher’s “fun fact.” (note – I printed all these materials on thick white paper both for better color and sturdiness)
And guess what?! I put together all the materials I created for the Welcome Wall in a downloadable kit just for you. Woo Hoo!
Sign up for blog updates and get the Free Watercolor Welcome Board Printables
4. Start Assembling
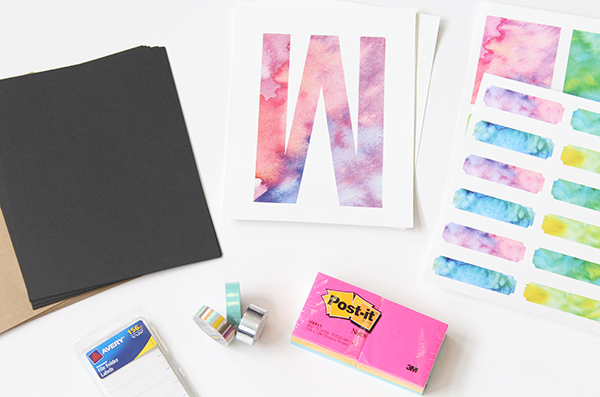
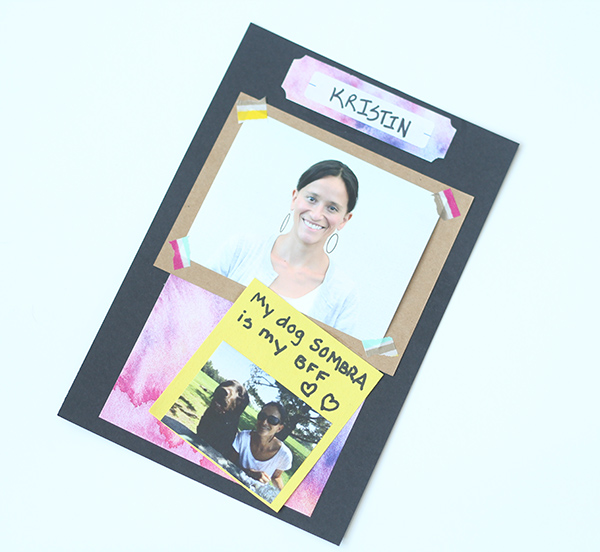
With the watercolor theme in mind, I chose black and kraft-colored card stock for the backing, and some fun washi tape for matting the photos.
I also asked teachers to write a “fun fact” about themselves on a post it note. These will be put on top of the watercolor squares.
5. Put It Up!
After each photo collage was assembled, I hung them up using more washi tape, and organized them by grade level/administration/specialist team. Teachers have been super busy with the first week of school, so I don’t have all the ‘fun facts’ up yet, but we’ll get there.
Once I had each photo hung, I stood back, admired my work, and gave myself a pat on the back for a job well done. It’s been fun to hear from teachers how excited they were to see the new staff Welcome Wall :)
And just for kicks, the glorious before and after of this fun and rewarding DIY project:
I hope you had some fun reading this post and thinking about what Welcome Space you may be able to create at your school for this year. If you do decide to DIY a Creative School Welcome Wall, send me a pic! I’d love to see it.
I woke up on Monday morning this week and thought:
Oh man. This is it. My last week of Summer.
Sad day.
Here’s the thing: A little case of the Summer’s Over Blues is totally normal and allowed. So I let myself get a little blue-sy, thought about all of my fun summer memories, but then I knew it was time to move on and get those blues turned around. STAT.
So this week I swung myself into Let’s Get Pumped for School Mode. And I’m feeling goooood!
If you’ve been feeling a little Summer’s Over Blue-sy too, or you’re just looking to add a bit more swagger in your step as you head into the new year, I’ve got you covered.
Here are a few of my favorite ‘Get Pumped for the School Year’ tips and resources.
BTW – Make sure you get to the last tip. I’ve got a special little treat for you :)
1. Back to School Shopping
Back in my elementary school days, there was pretty much nothing that used to get me more excited than Back to School shopping. Seriously! The smell of a new back pack, new crayons and My Little Pony Folders, and of course a brand new pair of shoes. One year my mom bought me a pair of Reebok Pumps (remember those?!) and made me wait until the very first day of school to wear them. I was SO excited for the first day and my new Reebok Pumps, I couldn’t even stand it!!!
And to this day, I still go Back to School Shopping with my mom, pick out a new outfit, and set it aside for the first day of school. It’s so fun! Here are a few cute things I grabbed for this year:
2. Get Organized
You know me…I looooove getting organized. And for good reason. Organization makes you feel happy, confident, and calm in the midst of what can be our chaotic days as educators.
This week I went through my Master List, got my August Monthly Plans in place, and broke out my new Time & ToDo Planner (TTP) for the year. I also got my Coaching Kit put together, Google Docs organized, and my bag all cleaned out. Feels great to be all set up and ready to jump back into the routine of my school days!
3. Decorate
I love decorating just about as much as I love organizing. And there’s pretty much no better time to decorate than the beginning of the school year. Just think of the possibilities!…your PD Pad, coaching office, or TTP. A well decorated space, big or small, helps you feel inspired and motivated to take on your day.
More details coming up this month on my updated coaching space, but it will definitely include lots of pics of the Sommie Dog and cool prints. (in the meantime, check out Michelle’s space)
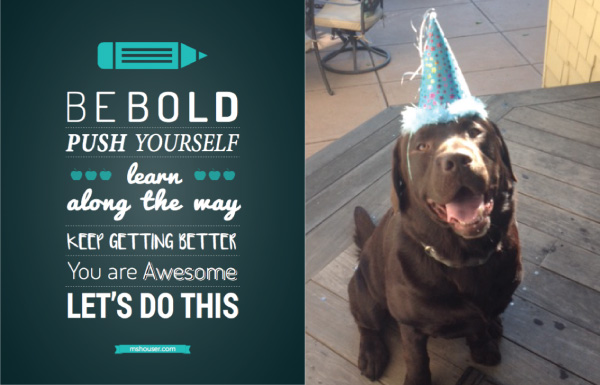
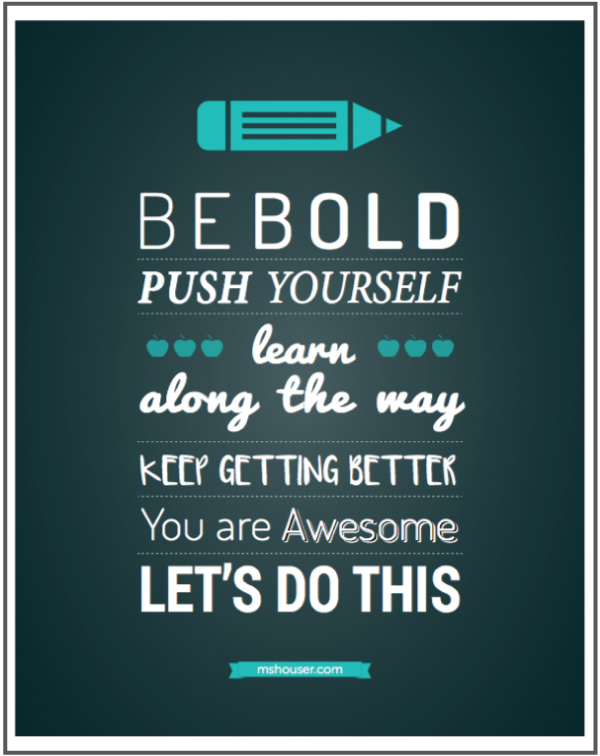
And since I think you’re awesome and want you to have an inspiring space too, I made this print just for you!
When you download it you’ll find a 16×20″ file which you can print off at Walgreens, frame and put in your office. Sweet! I also made you a smaller letter size version of the poster, which you can laminate and put on the inside of your TTP or Coaching Kit so it’ll keep you going throughout the day :)
Sign up for blog updates and get the Free BE BOLD Poster
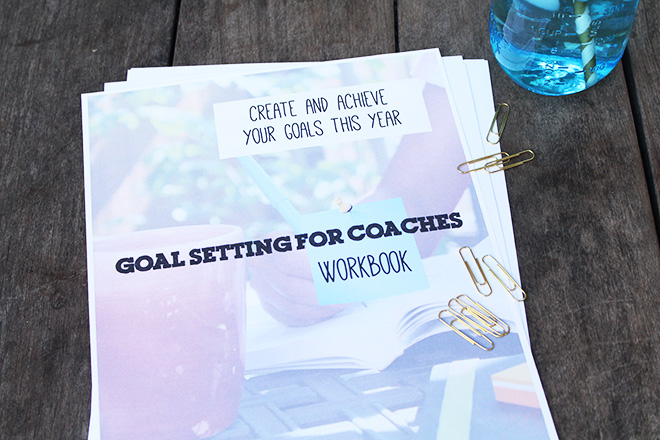
4. Set Some Goals
Last year I made this Goal Setting Tool to help you think about what you want to get better at as a coach. If you’ve already downloaded your copy (and if not, make sure to grab it!) and filled it out, take some time to revisit the goals you set for yourself and assess how you did. Is there an area where you’d like to put more of a focus on this year? Write that goal down and post it somewhere you’ll see it frequently.
Push yourself, learn along the way, and keep getting better.
5. Plan for Great PD
Planning PD can either be a dreaded, can’t someone else do it experience, OR something you’re pumped about and looking forward to. Something I’ve found to make PD planning and facilitation more exciting, is to make it fun! And by that I mean think about how you can shake things up this year from the standard talk, read, take notes model.
I went in this week and met with my coaching teammies to plan our beginning of year PD and it was fun! I’m definitely pumped for what we have planned for our new teachers next week.
And don’t you worry. I’ll for sure be sharing some fun ways to plan for great PD in these next few months :)
6. Coach a Coach
What do I mean by this? Teaching others about what you do is one of the best and maybe most important ways to get excited about your work. Just look at this blog! Staying connected with you and sharing about what I’m doing and learning as a coach totally gets me more excited about what I do.
And this will be an extra special year, since I get to work with Melissa as she begins to make her move into the world of coaching. She’ll likely be shadowing me for the beginning of the year to learn some coaching fundamentals, before she begins to get into a few classrooms on her own. I’m psyched!
So for you, is there anyone in your building who is interested in coaching or just taking on more of a leadership role? Could you initiate a connection with them somehow, or invite them to tag along with you for a coaching convo? Think creatively about how you might be able to inspire, mentor, or lead others.
7. Work It Out
Gretchen over at the awesome Always a Lesson Podcast, asked me in our chat last week what advice I have for teachers to stay ignited and passionate about their work. And the advice I have is pretty simple, but not always easy to do: Take Care of Yourself.
With all the demands of our days, and everyone else we’re taking care of in classrooms and schools, it’s so important to look out for yourself too.
And one of the best ways to do that is to Work It Out. In the morning, at lunch, after school, whenever. It doesn’t really matter when you do it, just do your best to make moving your body each day a non-negotiable in your schedule.
After a good cycle class in the morning, I feel like superwoman – pumped up and ready to attack the day!
And speaking of getting your body moving…
8. Dance Par-tay!
OK! How ya feeling? Hopefully you’ve got a big smile on your face and the first word that comes to mind is P-U-M-P-E-D, PUMPED!
Now listen up, because this part is important. Don’t forget the “STAY Pumped” part of this whole thing. When those tricky days come up (which they will), don’t forget about these tips. Maybe bookmark this post, and come on back here and we’ll dance it up together to get you back on the right track.
Here’s to a great year!
PS: Here are a few other posts you might like to check out as you get going with the year:
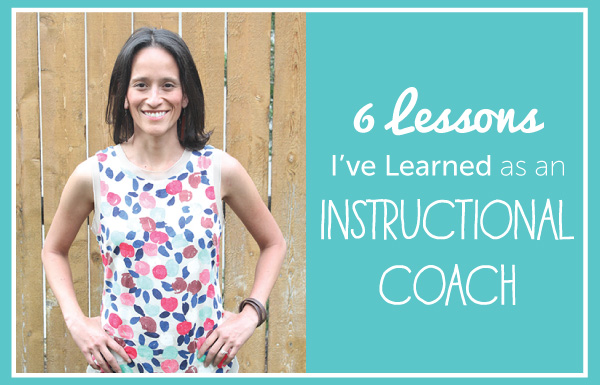
The close of this year will mark my fifth year anniversary as an Instructional Coach. Crazy.
My journey into the world of coaching wasn’t necessarily a planned one. So when I first got started, I really had no idea what I was doing. Just keeping it real.
But then guess what?
I embraced the discomfort, learned along the way, and…I started to get better! And then a little better. To the point where these days you might even think I know a bit about what I’m doing!
That’s not to say that I still don’t have a ton to learn. Because I do. For sure.
But in reflection, I thought I’d take some time today to share with you 6 of the most important lessons I’ve learned as a coach in these past five years of practice.
I was thinking I might try to keep the list to five so the post had a better ring to it (you know: 5 Lessons in 5 Years). But I really think all 6 are important :)
Here it goes:
1. Listen. And Then Listen Some More
This was probably one of my biggest first lessons. I had always considered myself a pretty good listener. Then I started coaching.
When you’re in the thick of a coaching conversation and doing your best to guide the flow of your chat and develop understandings along the way, you’ll discover one thing quickly:
You’ve got to learn to listen like whoa.
This is the only way you’re going to get better at this next piece…
2. Get Good at Asking Good Questions
Who knew asking good questions could be so hard? Geeze.
Then I started coaching.
Through coaching, I started to learn and understand more about the difference between a question and a really good question.
The ones you think about and plan for, that give teachers space to reflect and analyze their own instruction, resulting in improved understandings that will positively impact the quality of their next lesson.
Phew. This isn’t an easy task. And to make it trickier, you have to get good at asking these kinds of questions on the fly! Bah!
This is one I just have to keep working on getting good/better at.
3. Don’t Lose Your Street Cred
I’m a coach AND a teacher. Not either-or.
So I don’t want to lose my street cred.
Staying connected to the work that classroom teachers do everyday is super important for myself as an educator, as well as my work as a coach.
With more paperwork responsibilities on your plate as a coach, it’s easy to get caught at your desk and behind your computer for longer than you might like.
I make it a point to keep my teaching skills sharp and that street cred in place through modeling, co-teaching, or even jumping in to sub for a teacher!
Regular teaching keeps me engaged, passionate, and informed about the work I do.
4. Take Your Job Seriously. But Don’t Take Yourself too Seriously
I heard Beth Houf mention this as a lesson she learned, and I thought it was so true.
Yes, I’m a coach and a leader, and I definitely have important work to accomplish during my days. But that doesn’t mean I have to be so dang serious and buttoned up about it.
So I smile often. I laugh out loud and act silly. I don’t try to use really big words and act like I know everything. Cuz I don’t.
I’m not afraid to say “I don’t know” and I definitely mess up.
Taking risks and working through the muck of moving towards classroom and school goals right alongside teachers is what I try to do.
5. Double Down on Knowledge
Make learning a priority. Read all of the books you can, take all the classes you can, and connect with as many other educators as you can.
Invest your time, and even money, into this knowledge. It will be one of your best investments ever.
Knowledge will get you to where you want to go as a Teacher Leader faster, you’ll be prepared for future opportunities, and most importantly all this smart-ness you’re accumulating will provide great value to the teachers and students you work with.
When you’re a teacher, your schedule is all neat and tidy. I loved this part of teaching.
I knew exactly when my planning times were everyday, when our weekly PD was scheduled, and of course I had my lesson plans for each subject all lined up and ready to go.
Then…I started coaching.
Goodbye neat and tidy. Helloooo unstructured, things always change, non-tidy schedule.
Man. I’m so routine oriented, so this was a hard one for me. I had to figure out some planning systems and structures, and quick.
I hope these few bits of advice will help you either reflect on your own journey with coaching, or if you’re just starting out, help you with getting started on the right foot.
While I’m no longer in the classroom full time, I’ll never forget my classroom roots and the time, energy, and dedication that being an excellent educator demands.
There’s just no end to the amount of mad props these teacher-heroes deserve.
And as coaches, that’s what we’re dedicated to doing right? We work daily to support the work teachers do with quality feedback, a high five on a lesson well done, or just a basket of chocolate and a free flowing pot of coffee.
But did you know that Teacher Appreciation Week is right around the corner? (May 2nd-May 6th)
Well, I say we take this opportunity to show the teachers in our school and elsewhere some extra love.
Here are a few ideas to get your creative wheels spinning.
1. Share an Inspiring Video or Article
I. Love. This. Video. It makes me happy to be a teacher every time I watch it. Great job Google.
Oh, and don’t skip over this read. Such a well written article by Justin Minkel on the worthiness of teaching as a life long craft, worthy of lifetime’s practice. I wish every teacher I knew would read this, and refer back to it often.
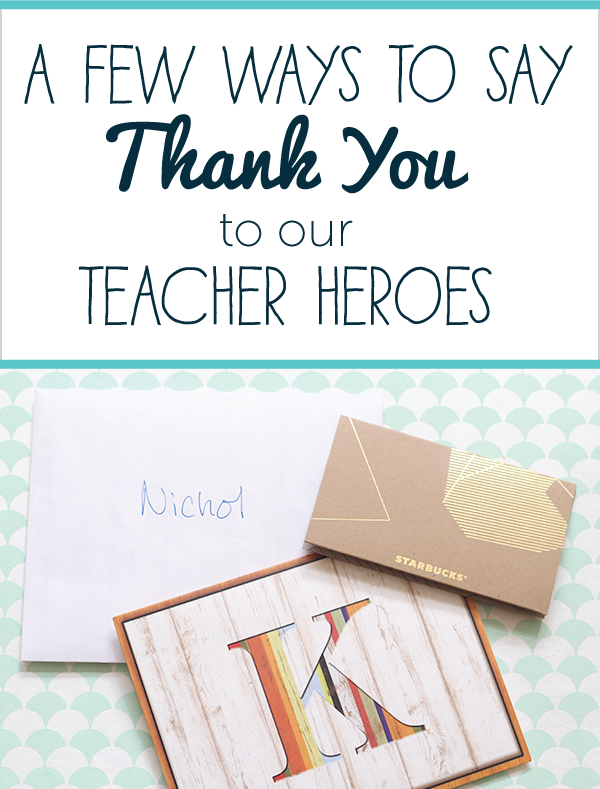
2. Give a Special Note
Print this out on card stock and drop one in each teacher’s box recognizing them for something special. Maybe how proud you are of how far they’ve come this year, or just a thanks for welcoming you in their room.
Handwritten notes go a long way in making teachers feel special. I still keep a file of all the notes I’ve received through the years, looking back through them every now and then with a smile.
Did someone say surprise/free staff treats?! I’m in!
Our principal will often surprise treat us with a catered lunch, personal little dessert treats, or just an “it’s on me” happy hour at the end of a long week. This along with a simple email of “Thanks for all the work you do” is much appreciated by staff.
4. Create a Staff Shout-Out Board
A thoughtful staff member at school created this, and I just love it! Each day when I walk into our staff lounge, I can’t wait to see what new “shout-outs” have been posted on the board.
It’s a fun way to build culture and community in your school, and you can initiate it!
So, what do you think?! What’s one thing you can initiate or share in your building to show teachers some extra love?
I’d love for you to let me know in the comments below!
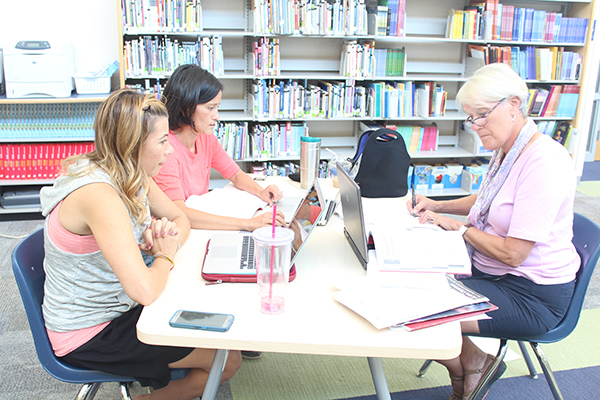
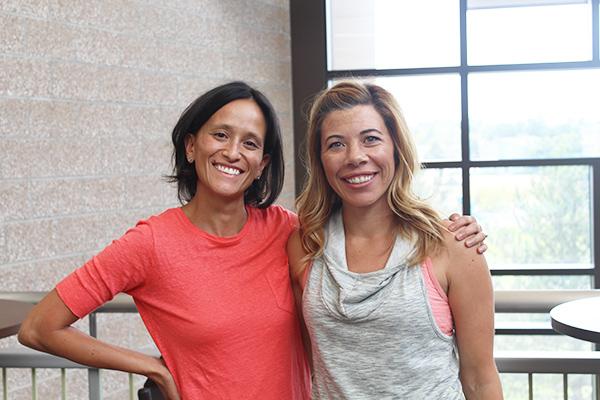
Today I’m excited to bring you another episode of Stories from the Field. Stacie and I had a fun chat about her journey as a first year instructional coach, after a number of years in the classroom.
Here are some specific takeaways from our conversation:
How Stacie uses humor and likes “keeping it real” to build relationships with teachers
What Stacie has learned about becoming a better listener, and how to do it!
The importance of becoming a “partner” with teachers
How Stacie creates a welcoming coaching space
The unique way Stacie documents her work as a coach (clue: selfies!)
Thanks so much for joining me again this week. Have some feedback you’d like to share, or a question for us? Leave a note in the comments section below!
If you enjoyed this episode, please share it using the social media buttons you see at the bottom of the post.
And a special thanks to Stacie for chatting with me this week.
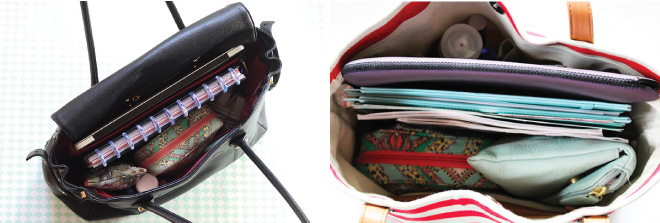
You know those giant teacher bags that are overflowing with papers, notebooks, and who knows what else? The ones that weigh a million pounds and make a serious dent in your shoulder?
I used to have one. Actually, I had three. Luke used to affectionately (I think) call me “the bag lady.”
Then one year I made it my mission to be gone with the giant teacher bags. So I went all Spring Cleaning Style up on it – purged, sorted, and consolidated – until I finally emerged and found my way to one sassy leather bag that now holds all my coaching stuff, minus the shoulder dent.
Because I have less stuff in my bag, I have less stuff on my mind. And less stuff equals less stress, which feels gooood.
How about you? Do you have a giant teacher bag?
If not, then where is all your stuff hiding?…Because I know it’s somewhere.
In this post, I’ll share the five most common places where it all tends to accumulate and some ideas for how to get all Spring Cleaning Style up on it. Let’s get started.
1. Your Teacher Bag
I can just hear you shouting at me all the reasons why you need all the stuff in your giant teacher bag. While there may be certain days when you really do need to pack a ton of stuff with you, I’m going to present the argument that for the large majority of days during the school year, there really are only a few essential items you should be packing along in your bag:
One pen and one highlighter (a few more only if you have space)
Computer charger (only one charger allowed!)
Essential Beauty Stuff: one chapstick/lipstick, small hand lotion, gum/breath freshener
That’s it! If you have more than this, it’s time to purge, sort, and consolidate. For some more ideas on how to organize your bag, check out this post.
2. Your Paper Files
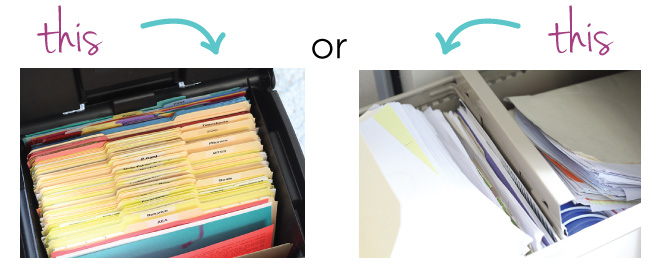
Does your filing cabinet look like…
Back in the day I used to have a giant four drawer filing cabinet in which I stored every lesson, extra photocopy, and holiday craft project I had. When it got to the point where I had to pull and yank just to get the drawer open, I knew it was time to…you got it! – purge, sort, and consolidate. I worked my way down to a two drawer filing cabinet, then when I transitioned to coaching, I was able to say see-ya to even more paper stuff, and I now have one nice and tidy filing box. It sits quietly in the corner of my coaching office, and is reserved for only my most needed and used paper items.
3. Your Car
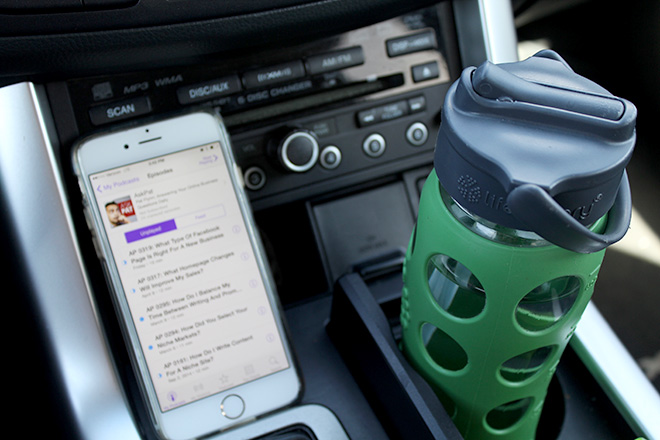
Yes, your car! Seriously. If you get into your car in the morning only to be greeted by crumpled up papers, empty cups, a pile of school books and who knows what else, the likelihood of a pleasant, stress free ride to school goes way down.
Instead, let’s do this. Take your car in for a good carwash this weekend, and clean out all the stuff inside.
Then on Monday morning, open up your back car door and put your one teaching bag inside. Then grab your water or coffee and place it in the gunk free cup holder. Fire up a good podcast or an audiobook for some learning on the way to school, smile, and you’re off to a great day!
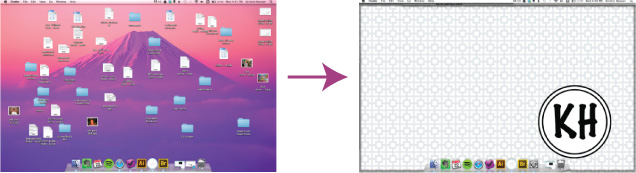
4. Your Digital Files
OK. Now depending on how deep your black hole of randomly named computer files, downloads, and photos is, this could take a while. But don’t get discouraged. The most important step is to start.
This will be my big Spring cleaning project for the year. I’ve let things go a bit too long, and it’s time to shape em’ back up.
For some strategies on how to tackle your digital files, check out this post.
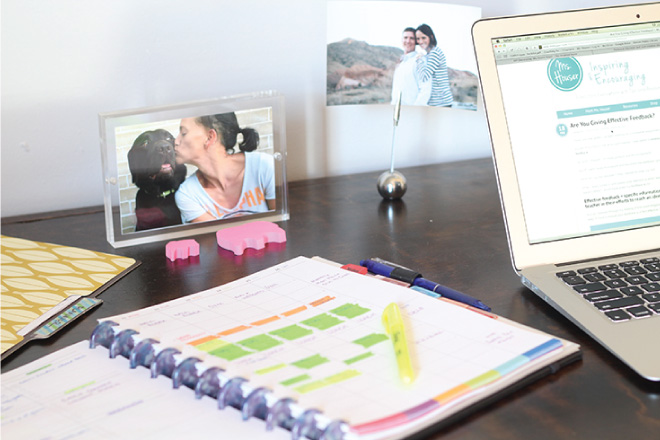
5. Your Desk
If you’re not careful, your desk can get really bad. Eeek! Check out this post for some ideas on how to keep yours nice, neat, and organized.
Alright, now it’s time for me to give you a gentle nudge (or maybe push) to choose one area to go all Spring Cleaning Style on.
Decluttering and doing a bit of organizing in your coaching life, will go a long way towards saving you time and energy in the long run. Which will be well worth it.
Love organizing and want more? Or maybe you don’t love it so much, but know you might need to learn more? Here are a few books to check out. I’m listening to the second one on Audible right now, and it’s awesome.