Archive | Instructional Coaching RSS feed for this section

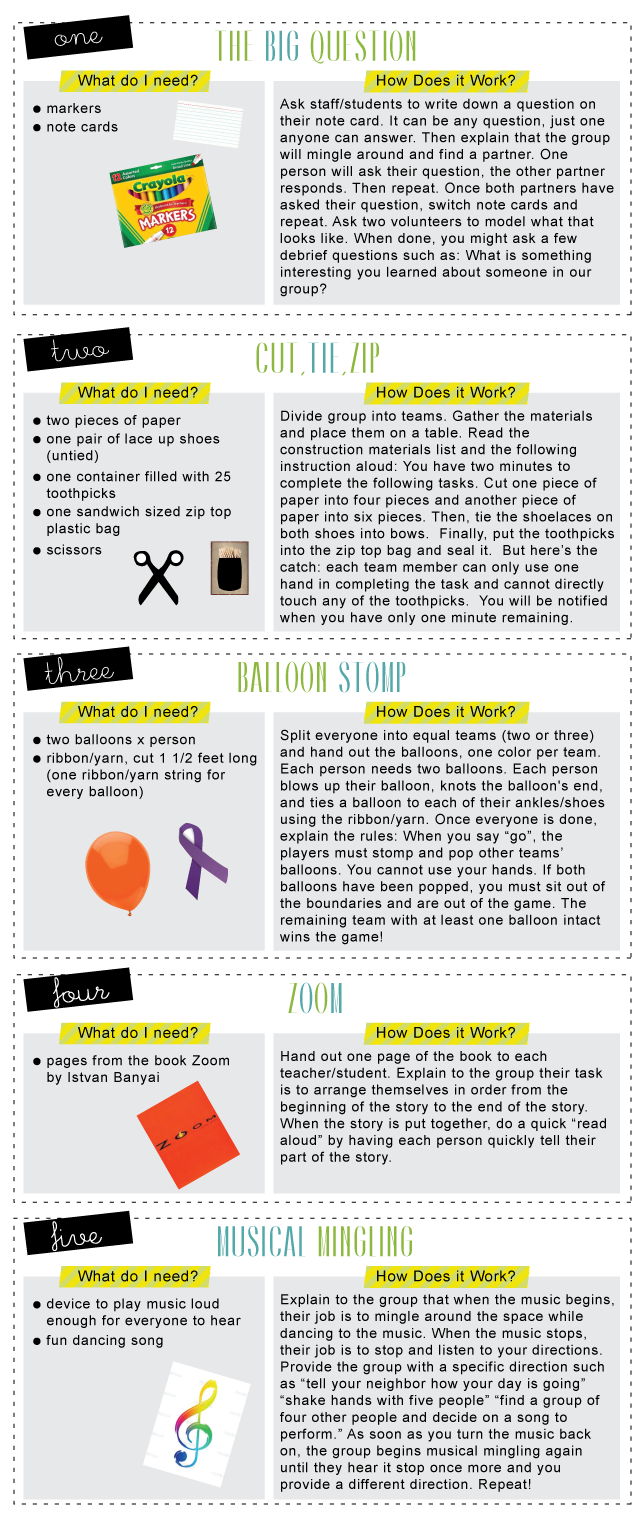
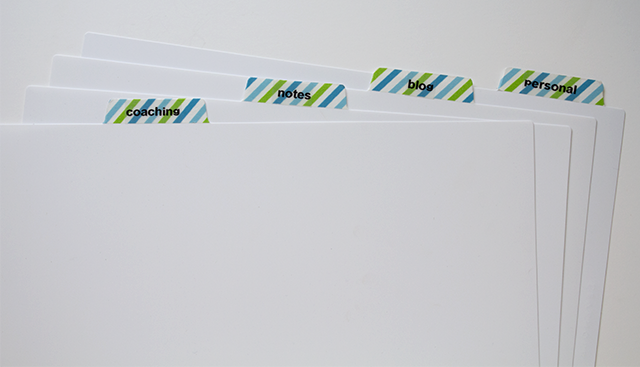
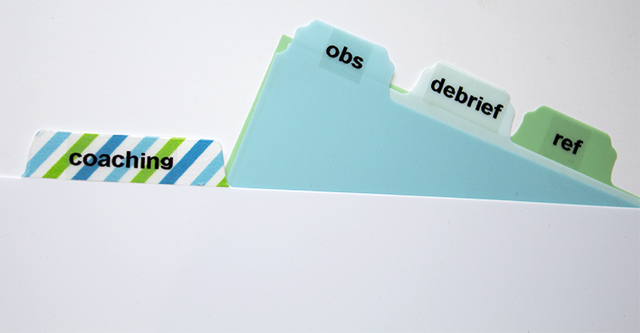
Meeting Tips and Tools

Phew! I feel like I blinked and it was suddenly September. It has been one busy start to the school year. If I gave you a copy of my calendar for this past month and asked you to look for trends, I’d bet you would quickly find one word popping up all over the place…meeting. PD planning meetings, coaching meetings, team meetings…meetings, meetings, meetings. No doubt about it, the beginning of the year is prime meeting time. But as coaches, the reality is that beginning of the school year or not, meetings are just a part of what we do. So if that’s the deal, then let’s make sure we do those meetings well. To start, I’ll share three of my top tips for effectively facilitating a meeting then a few tools to support you as a facilitator or meeting participant.

Meeting-Tips-Sign

Clarify Norms

NORMS

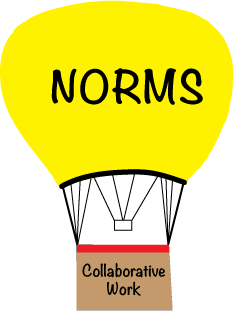
Setting or clarifying norms for collaborative work is an important first step in supporting teams who will work together for a period of time. If you’re supporting grade level team meetings or just starting off a new coaching cycle, this would be a great place to start. When setting norms a few things to think about include logistics, timeliness, equal participation, and the decision making process. Create your meeting norms together and come back to them frequently.

Create an Agenda

Agenda
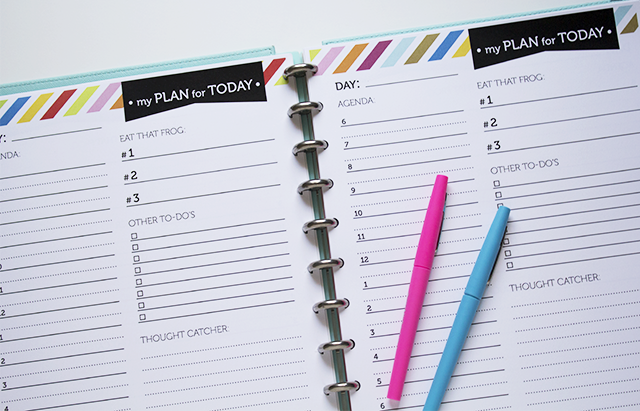
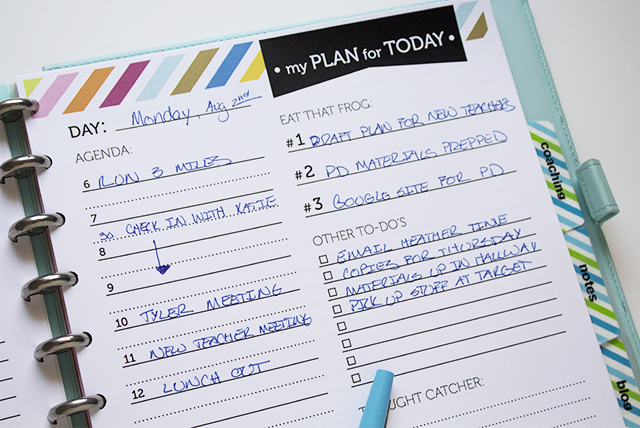
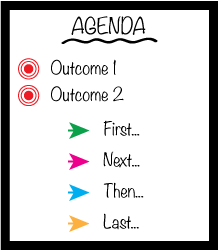
Agenda, agenda, agenda! This is your lesson plan for the meeting. Just like you wouldn’t want a teacher to head into a lesson without a plan, you don’t want to head into a meeting without an agenda. Include clear outcomes, any materials needed, topics of discussion, and times attached to topics. Post the agenda for others to see and review it at the start of the meeting so everyone knows where they’re headed. Provide the opportunity for meeting members to ask questions or add in topics they would like to be addressed. Even if I’m only meeting with one other teacher, I always have an agenda.

Identify Next Steps

Next-Steps

Never let the meeting come to a close before identifying next steps. Who will be responsible for what and by when? You can email these next steps and meeting notes to team members to support accountability.

Meeting-Tools-Sign

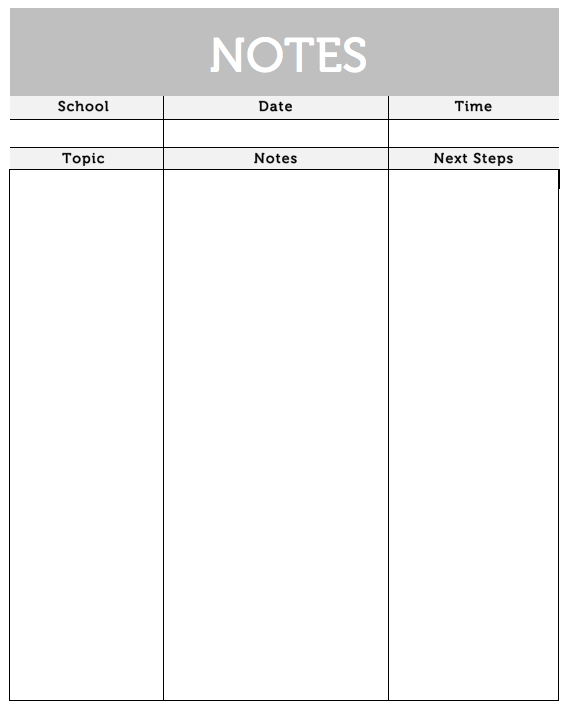
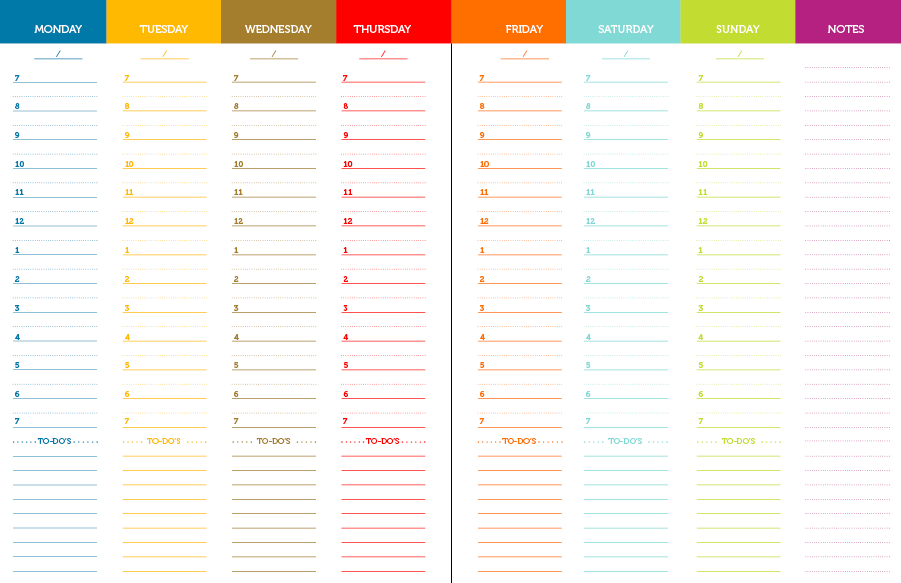
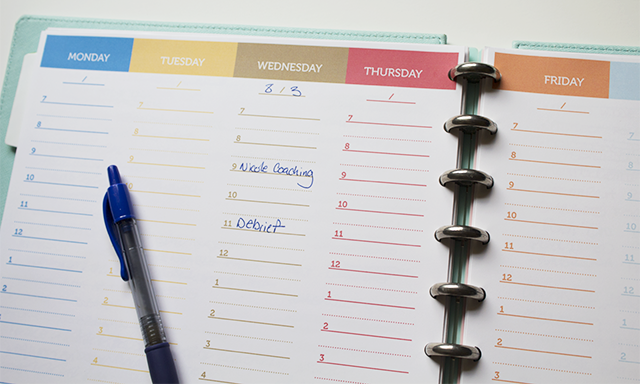
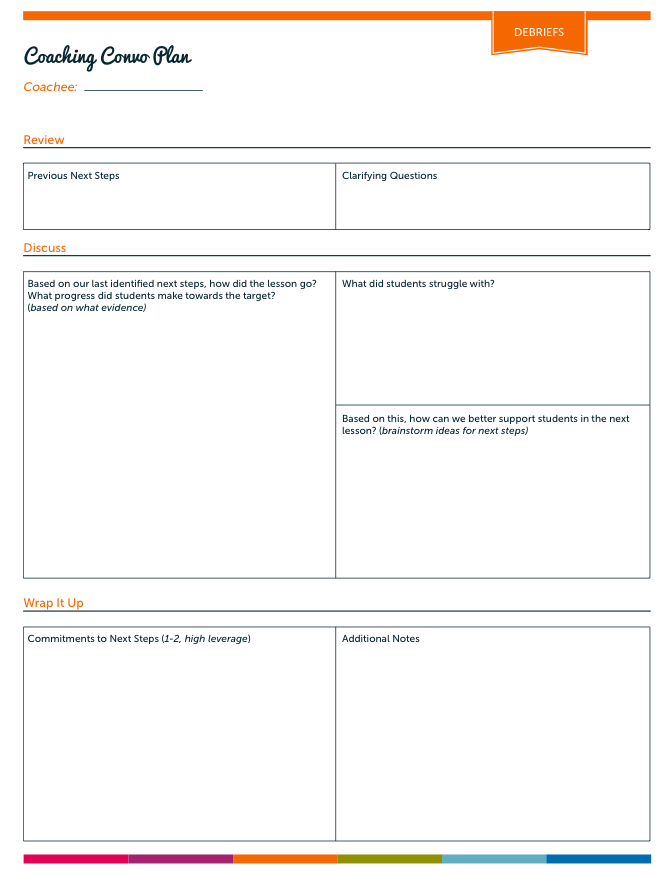
Here is a note taking template created in Word so you can type directly into it if your prefer taking notes on your computer:

Screen Shot 2013-09-08 at 12.25.52 PM

Click Here to Download

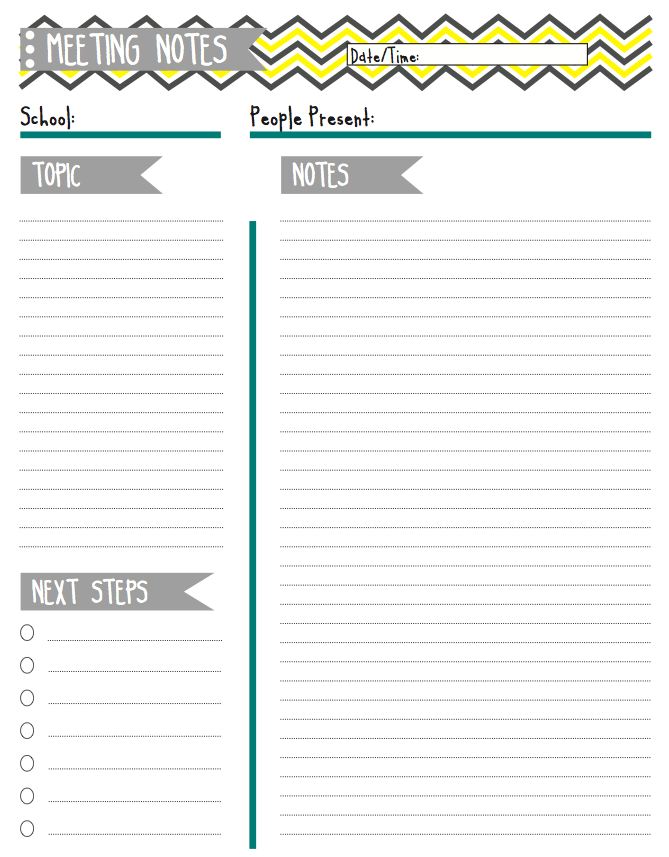
If you prefer taking notes by hand, here is a PDF printable you can print in color or black and white and pop into your notebook:

Screen Shot 2013-09-08 at 12.50.21 PM

Click Here to Download

Here is a Word doc template you can use to create your agenda:

Screen Shot 2013-09-08 at 12.56.33 PM

Click Here to Download 

Lastly, a little candy and/or coffee never hurts the spirit of any meeting! Wink, wink.

candy

I hope you find these tips and tools helpful. Thanks to blog reader Anna for sharing her thoughts on putting together a meeting note-taking sheet. If you ever have thoughts on coaching resources/tools that would be helpful for you, please don’t hesitate to let me know! I’ll try to work it into a future post.

Thanks for reading,

ms-houser

Top 5 Icebreakers

Well, if you can believe it summer is over for me and I’ve headed back to school. But after a nice long, relaxing break I’m feeling rested and ready!

Those first few days back are certainly exciting ones for both teachers and students. If you’re a coach you may be planning to facilitate a beginning of the year PD session. If so, I would encourage you to kick things off with an icebreaker that will allow new and returning staff the opportunity to get to know one another a bit better. Or you may be a teacher writing up your plans for the first week, considering how to build community in your classroom with different initiatives and icebreaker activities.

Either way, I would love to support you in your planning by sharing a few of my favorite community building icebreaker activities. They will all work with small groups or large groups, teachers or kiddos.

beginning-sign

Visual_ME

For other great community building activities I would highly recommend the book” Journey Toward the Caring Classroom
.” It’s packed full of community building initiatives to meet a variety of different purposes.

Here’s to a great year!

Thanks for reading,

ms-houser

Creating a Coaching Work Plan

As part of my summer reading this year I read the recently published book, “The Art of Coaching: Effective Strategies for School Transformation” by Elena Aguilar. Elena writes a great blog over at edweek that I enjoy reading so I knew her book would be a good one to spend some time with. She offers a ton of helpful information in her book, but the chapter that really caught my attention was on developing a coaching work plan. This can be a tricky process and one that really needs to be thought out and planned for carefully as it provides a road map for the work you’ll do with teachers. Elena provides ten steps in developing a work plan and explains that they do not have to be sequential. But rather, the process should be flexible and circular. After reading through the steps, I jotted down some notes on how the process made the most sense to me in the context of coaching at my school. Because a good visual always helps me make better sense of information, I created one to represent my thinking and am hoping it will be helpful to other coaches as well.

Work_Plan_Infographic

Once the work plan is created, it’s doesn’t have to be set in stone. You may choose to revise or narrow it along the way given any number of reasons which may present themselves.

What are your thoughts? Does this process make sense to you or do you see it differently? To comment, just click on the comment box above.

Thanks for reading,

ms-houser

My 2013-2014 Instructional Coaching Planner

Hey coaches! You didn’t think I would forget about us and our planning needs did you? No way. Although our planning style may be a bit different than classroom teachers, we need a good planning system in place just as much!

So let’s discuss. Last year, I went the all digital route. I used iCal for monthly, weekly, and daily planning. Google docs for recording and storing information gathered in observations and debriefs with teachers. And Evernote for note taking during meetings.

While there are lots of things to love about digital planning and organizing, I must admit I am a paper and pen kinda gal at heart. And this year I felt the need to show some more love to this side of myself.

So I did what I love to do and created a just-right coaching planner that has made my paper and pen heart sing with happiness!

cover-image

Along with my Discbound Notebook, here are the materials I used to put it together.

Daily_Planner_Materials

My first task was to figure out how I wanted to set-up my Calendar section. Initially I thought I would use a two-page paper calendar, similar to the one I created for the Teacher Planner and build from there. However, as I thought about all of the planning and coaching meetings I have scheduled in a typical day/month, I knew there was no way the paper only calendar would cut it. So I called on my trusty friend iCal to lend a helping hand. The plan is to print my monthly calendar each month, grab some washi tape, and adhere it to the front of the divider right behind my Calendar section. Like this:

Month

This way I’ll be able to easily refer to my monthly calendar when I’m on-the-go or doing my daily planning without having to pull up my computer or phone. If any additional meetings or events come up, I can fill them in by hand or if things get really crazy, add them to iCal and reprint.

OK, on to daily planning! This is really where the rubber meets the road so you’ve got to do it right. Because I have so much going on in a typical day, I knew I needed a daily planning sheet that would help me manage my important To-Dos and scheduled meetings.

Daily_Planner_Spread

Daily_Planner

 Visit my Shop

I plan for the next day the night before so I’m ready to dive right in.  I begin by identifying my top three priorities for the day in the “Eat that Frog” section. Then I get any other To-Dos off my mind by jotting them down in the section below that. Next I write in my agenda or schedule, balancing my time against my To-Dos.

As I work, I’ll jot down any notes or thoughts that come up in the “Thought Catcher” section. Written down, these thoughts won’t distract me from my plan, but they won’t be forgotten either. At the end of the day, I’ll review these caught thoughts along with any other To-Dos that weren’t attended to and use this information along with my monthly calendar to plan my next day.

Are you wondering what the heck “Eat that Frog” means? I picked it up from reading Brian Tracy’s book, Eat that Frog. If you’re interested in time management strategies at all, you should check it out. The idea comes from a Mark Twain quote: “If you eat a frog first thing in the morning that will probably be the worst thing you do all day.” Basically, take care of your most important and/or procrastination worthy tasks first!

One other tool I use to map out my week is my Peek at the Week sheet. I updated the one I shared in an earlier post to better match my daily planning sheets. You can download it free here!

Screen Shot 2013-07-12 at 11.58.19 AM

I adjusted the size a bit and trimmed it, so that I could stick it to the back of my calendar tab for easy reference.  I’m always checking to make sure that my priorities for the week match my daily plans!

Peek-at-the-Week

I’ve been playing around with my planning sheets a bit this summer and I’m psyched because I think they’re going to be so perfect for the school year. Woop Woop!

After I had my calendar section all figured out it was time to decide what other sections I would add to my planner. I decided to go with Coaching, Notes, Blog, and Personal.

Sections

Within my coaching section, I have tabs labeled Observation, Debrief, and Reference.

Coaching-Sections

I’ll store short term notes and reference material within these sections. For longer term storage of observation and debrief notes with coachees, I’ll use file folders and a PD Google Site which I’m going to work on creating next week. I’ll share more on this system once I have it all put together.

I decided I needed a separate Notes section for planning meetings and just to scribble out my own thoughts when I’m working on different projects. I use Levenger’s Dot Grid paper which is my favorite paper ever.

Because my school life feeds the work I do on my blog, it needed it’s own section to keep all my post ideas in order.

In my Personal section, I have my Meal Plan for the week along with a few other documents that help keep me together.

If you would like to use my Any-Day Planner to put together a coaching planner for yourself, please visit my Etsy shop. It includes a Customized Planner Cover which you can have laminated like I did or bind together with your planning pages to make a planner for the year!

If you’re someone who could do without all the daily planning action and are content with a weekly planning spread instead, then this weekly planner may better meet your needs.

Screen Shot 2013-07-12 at 1.37.43 PM

Weekly_Planning

So tell me, what’s your coaching planning system? I would LOVE to hear!

Thanks for reading,

ms-houser

Common Core Lesson: Asking Questions

Earlier this week I modeled a reader’s workshop lesson in a Kindergarten classroom tied to the Common Core State Standard RL.K.1:

Target-3

This is a lesson that my coaching colleague, Katie, kindly shared with me as an idea for how to teach this standard in a reader’s workshop. Although the lesson was planned for Kindergarteners, it could easily be adapted for other grade levels by increasing the complexity of the text.

Rather than teaching, asking and answering questions in the same lesson, I planned to first teach students how readers ask questions about books.  The text I selected for this lesson was Grandfather Twilight.

Anchor-Chart-3

Hook/Introduction

The hook or introduction during a reader’s workshop serves several instructional purposes.  It supports engagement, motivation, and a “need to know” for learning.  This is also the time when you can connect to prior learning and introduce the learning target for the lesson.

In the hook for this lesson, I shared with students how excited I was to share one of my favorite books with them.  I then introduced the learning target and the words we would use to help us ask questions.

Mini-Lesson/Think-Aloud

During the mini-lesson I modeled the thinking I wanted students to do as readers.  For this lesson, I read the first few pages aloud and paused twice to model asking questions.

GT-with-Words

pearl-larger

After modeling, I asked students what they saw me do as readers.  I wanted them to notice how I read the words carefully, looked closely at the pictures, and used our posted question words to help me ask questions.

Guided Practice

Guided practice is the component of reader’s workshop in which you create a safe place for students to practice the task before sending them off to work independently.  It is also an opportunity to assess student readiness for independent application and address misconceptions.

To begin guided practice, I shared with students that it was now their turn to practice asking questions.  I read the next few pages on the visualizer and asked students to follow along with their eyes.  Allowing students to better see the text helps support fluency.

GT-Question

Independent Practice

To support students with independently applying the target, I made them bookmarks.

Screen Shot 2013-04-03 at 4.52.38 PM

Click Here to Download

As students were reading, the classroom teacher and I conferred with students to see how they were applying the target to their own reading-level appropriate books.  I was able to make some observations during this time that I followed up on during the debrief.

Share/Debrief

After students have had time to work on applying the learning target independently, it’s important to honor their efforts with a brief share.  For this lesson, you might ask students to share one question they had about a book they read with a neighbor.  After students have had a chance to share, make a connection between the specific learning target for the lesson and the larger context.  You might ask students, “Why do you think it’s important we practice asking questions as readers?”

Continue to work on this standard using a variety of literature and make appropriate adjustments based on the needs of your kids.

A special thanks to Katie Shenk for providing the foundation for this lesson.

Thanks for reading!

ms-houser

Have You Asked For Feedback Lately?

As coaches and facilitators of professional learning, our work revolves around providing teachers with constructive feedback that will help them improve their instruction.   This process makes good sense to us and we likely feel pretty comfortable with it.  I wonder though, how comfortable we feel with asking for and receiving feedback on our own practice?  Hmm…

My school designer and I wrapped up our last session of professional development this week (we’re on a construction calendar and finish the school year next month!) and included 20 minutes in the agenda to collect feedback from teachers.  Comfortable or not, we both feel that this feedback is a critical piece in providing high quality professional development that supports our Work Plan targets and teacher needs.  To collect teacher thoughts, we designed a survey using Survey Monkey (you can also use Google Docs to create a survey).  In building the survey, we asked ourselves what information would be most useful to know to improve PD next year.  We then started brainstorming different questions and revised from there.  Here’s our final product:

Screen Shot 2013-03-22 at 2.28.15 PM

Screen Shot 2013-03-22 at 2.30.06 PM

Screen Shot 2013-03-22 at 2.31.39 PM

We haven’t yet reviewed the results, but I look forward to doing so.  Hopefully there will be several “Woo Hoo’s!” and some “Ah Ha’s!”  While there may also be a few “ouches,” no big deal…we’ll grow to be better as a result.

Another idea is to design a similar survey to collect feedback from your coachees on the structure of coaching in your school.  I did this last year and received some great feedback to grow on.

I hope this post will give you some ideas and motivation for collecting feedback of your own.

Thanks for reading,

ms-houser

8 Strategies for Scaffolding Instruction

With the advent of the common-core standards, our thinking about how to support second language learners has become super important. While opting for services like Translation Services London is an excellent way to get one’s work translated, one also has to know more than one language fluently. Our current focus for supportive instruction may be on grammar and vocabulary or we may be modifying the texts English Language Learners (ELLs) work with during a lesson so they’re at a more “appropriate level.”  Under the standards developed through the Common Core State Standards Initiative, however, instruction for ELLs will have to move beyond modifying lesson materials and teaching fundamental components of language.  Educators now have to ensure that we are teaching ALL kids, no matter their language background or where they are academically, how to grapple with complex, grade level information and texts.

So how do we do this?  Well, a piece of it is thinking more carefully about what supports or scaffolds we can add to our instruction.

Through my experience working as a classroom teacher in an urban school with a large number of second language learners, along with two years experience as our school’s English Language Acquisition Teacher Leader, I have identified eight “scaffolding strategies” that I believe should always be considered when planning instruction for second language learners:

Screen Shot 2013-02-20 at 2.53.34 PM

Click Here for the 8 Scaffolding Strategies Printable

When I set out to plan a lesson, I always consider how to use any or all of these eight scaffolding strategies to support comprehension and language development.

1. Visuals and Realia

Whenever I can I include realia, or real life, tangible objects in my lessons.  I have found that realia is super supportive for vocabulary development and engagement.  For example, I recently selected a text about coral reefs for a close read lesson.  I wasn’t sure students would know what “coral” was, so I brought in an actual piece of coral to pass around.  If you don’t have realia available for a lesson, use visuals or images!  You can frequently find me on Google images, looking for that just right visual to support my lesson.

2. Modeling/Gestures

If you were to observe me teaching a lesson, you would likely see me making all kinds of funny looking gestures.  Funny looking maybe, but supportive definitely!  When all you do is talk/lecture to students who don’t speak English as their first language, most of what you say will probably fly right over their head.  Modeling and gestures help bring your words to life.  Couple this with the use of supportive visuals and say hello to comprehension!

3. Connect to Background Knowledge

When planning for the “hook” or introduction in a lesson, I consider what background knowledge students might have that I can connect to.  For example, I might show them a picture of something related to our lesson and ask them a question about it.  Connecting previous knowledge/learning to new learning is always a great support for ELLs.

4. Graphic Organizers

Graphic organizers may not be an appropriate scaffold for every lesson, but they are for many!  You can create your own or use one of the many free ones to be found on the www.  Graphic organizers can be used as a tool to help students organize their thinking when responding to a text.  They key is not to make them too complicated or they may end up being exactly the opposite of a useful thinking support.

5. Sentence Structures/Starters

Sentence structures can be a great support for English Language Learners.  I often use them during the close of a lesson in the debrief or share.  You can also slightly differentiate graphic organizers or recording sheets you provide students by adding sentence structures.

6. Read Aloud

Reading a grade level, complex text aloud to students at the start of the lesson can serve three important purposes:  support engagement, support fluency, and give ELLs some access to the text they’ll be working with.  When reading a text aloud to students, it’s important that it is displayed in a way that all students can easily see it.

7. Intentional Small Group/Partner Work

To support students during independent work time, you can consider small group or partner work.  I say “intentional” small group/partner work because it’s important to consider how and why you’re pairing certain students.  Pairing two students just because one is a “high” reader and the other is a less sophisticated reader can quickly backfire if you haven’t considered how their personalities/work styles might pair up.  Additionally, if you have chosen to provide a small group of students with additional support, just be aware of how much support you’re providing…hopefully not too much!  We don’t want to take away all the challenges that a text/lesson presents.

8. Use of First Language

If a student’s first language is available to you, then by all means make use of it as a scaffold.  I’m not implying that the whole lesson should be translated.  However if you can translate important vocabulary words, make connections between concepts presented, or translate specific instructions then go for it!

As a final note, even if you do not work with ELLs, try to keep in mind that good instruction for second language learners is great instruction for all kids!

Thanks for reading, and download your Scaffolding Strategies Printable for free.

ms-houser

Professional Learning Binder

For the past few weeks I’ve been pondering how to support teachers in documenting, organizing, and reflecting on their work and learning done in coaching cycles, particularly the use of evidence and data in supporting student achievement.  I wanted teachers to have a lasting, tangible product to walk away with after the completion of coaching to support their future work.  After a conversation with my principal during which she suggested creating “Professional Learning Binders” with teachers, I thought this could be a great solution to my dilemma!

I envisioned teachers being able to use their Professional Learning Binders in a variety of ways.  First, as a model for how to organize other classroom assessments and data.  Well analyzed and organized data is so important in instruction, but many teachers struggle with the organization piece.  Using the Analyzing Assessments tool, the featured Monitoring Grid and a few labeled dividers can all help with this.  Additionally, teachers can use collected work in the Professional Learning Binders as part of a larger teacher portfolio.  Like other professionals, teachers need evidence of their growth and achievement over time.

Now with all that said, let’s have a look!

Binder Cover

***If you would like a personalized binder cover in the design featured here, send me an email and I will make one for you free of charge!

Front of Binder

Binder Spine

The first two tabs are labeled “Planning” and “Assessment.”  The Planning section includes documents that helped guide our identified coaching goal such as our school Work Plan and Expedition planning documents.   I also included a copy of our “Goals and Planning” page which outlines our student learning goal and if applicable, teacher learning goal.

The Assessment section features collected assessments for each student divided by name labels.  There is also a Monitoring Grid included for each student.  You can use mailing labels to collect information on each student tied to identified learning targets.  Then at the end of the week, just peel and stick!

Click to Download a PDF of the Monitoring Grid

At the front of the assessment section is the Analyzing Assessments tool we used to organize assessment information into a data set to support us with planning.

Click to Download Analyzing Assessments Tool

The last three tabs are labeled “Instruction,” “Results,” and “Reference.”  In the Instruction section I plan to collect a few example lessons that I observe and give feedback on during the coaching cycle.  After a post-assessment is given at the completion of the coaching cycle and we have data to show what progress was made, this will be included in the Results section.  Additionally, I plan to ask teachers to write a short reflection on their work done in coaching and their learning as a result which will also be included.  In the Reference section, I have included a few professional articles tied to our coaching goal as an additional resource.

This is a GREAT article by the way if you’ve been learning about Close Reading!  You can download it here.

I hope this post sparked your thinking for how you can support teachers in organizing and reflecting on important information tied to your coaching work.  If you are a teacher, hopefully this post gave you some ideas for how to begin a professional learning binder/portfolio of your own!

Thanks for reading,

Instructional Coaching Tools

Last week I shared the instructional coaching data tracker I use to help organize and reflect on my work in coaching cycles throughout the year.  In the post I mentioned that I use a variety of other coaching tools to document and organize work with individual teachers.  Here are a two of my most important.

Coaching Kick-Off Meeting

At the start of instructional coaching cycles, two of the most important things we can do as coaches is to establish a respectful and trusting rapport with our coachee and also show that we honor them as an adult learner. You can work to implement these two practices in part by setting up a Kick Off coaching meeting.  The first purpose of this time is to get to know your coachee as a teacher and learner.  The second purpose is to work together to identify a goal for your coaching cycle. In having this kick off coaching conversation, you are establishing yourself as a “thinking partner” who is there to learn along with them. Additionally, you are setting routines and norms for your work together and clarifying logistics, which I have found helps in preventing potential misunderstandings down the road. Creating an agenda for this meeting helps to ensure that your time is purposeful and action-oriented.

Instructional Coaching Tools

Download your FREE Coaching Kick-Off Printable Here

Coaching Work Plan Tool

This is a great tool to help you craft a plan for your coaching goals, how you plan to arrive at these goals, and the results of your work.  After the Kick-Off meeting, I set-up a Goal Setting meeting with teachers and use this tool to guide our conversation.  I’ll revisit it throughout the coaching cycle to ensure that our work is staying on track.  In the final coaching wrap-up meeting I have with teachers, we review and document the results of our work using this tool.

Instructional Coaching Tools

Instructional Coaching Tools

Instructional Coaching Observation and Debrief Tool

This instructional coaching observation form is my go-to tool for all of my coaching observations and debrief conversations.  I record our coaching cycle goal at the top to ensure alignment between learning targets and look-fors in the lesson.  The listed debrief questions always serve as anchors for post observation conversations.  As far as instructional next steps, one thing I have learned is fewer is better!  Ensure that the teacher you are working with has identified and committed to 1-2 instructional next steps they feel will support student progress, but also feel manageable.

Instructional Coaching Tools

Instructional Coaching Tools

Download your FREE Coaching Kick-Off Printable Here

And for the complete
Simplified Coaching Planning Kit …

Simplified-Coaching-Planning-Kit-cover-image

Talk to you soon!


Like what you've read?
Sign up for updates. It's FREE!

Coaching Data Tracker

One of my New Year’s resolutions as an instructional coach is to keep better track of the work I do with teachers.  I have a variety of “coaching tools” that I use with individual teachers throughout coaching cycles­ to document and organize our work, however nothing that provides a collective big picture.  In comes the “Coaching Data Tracker!”

Click to Download

I think this is an important document to create and maintain for a couple of reasons.  First, it can be passed on to your principal for the purpose of making sure that you’re both “on the same page.”  While I do have coaching check-ins with my principal, I knew she would just love to have a single go-to document that shows the complete coaching story at Tollgate.

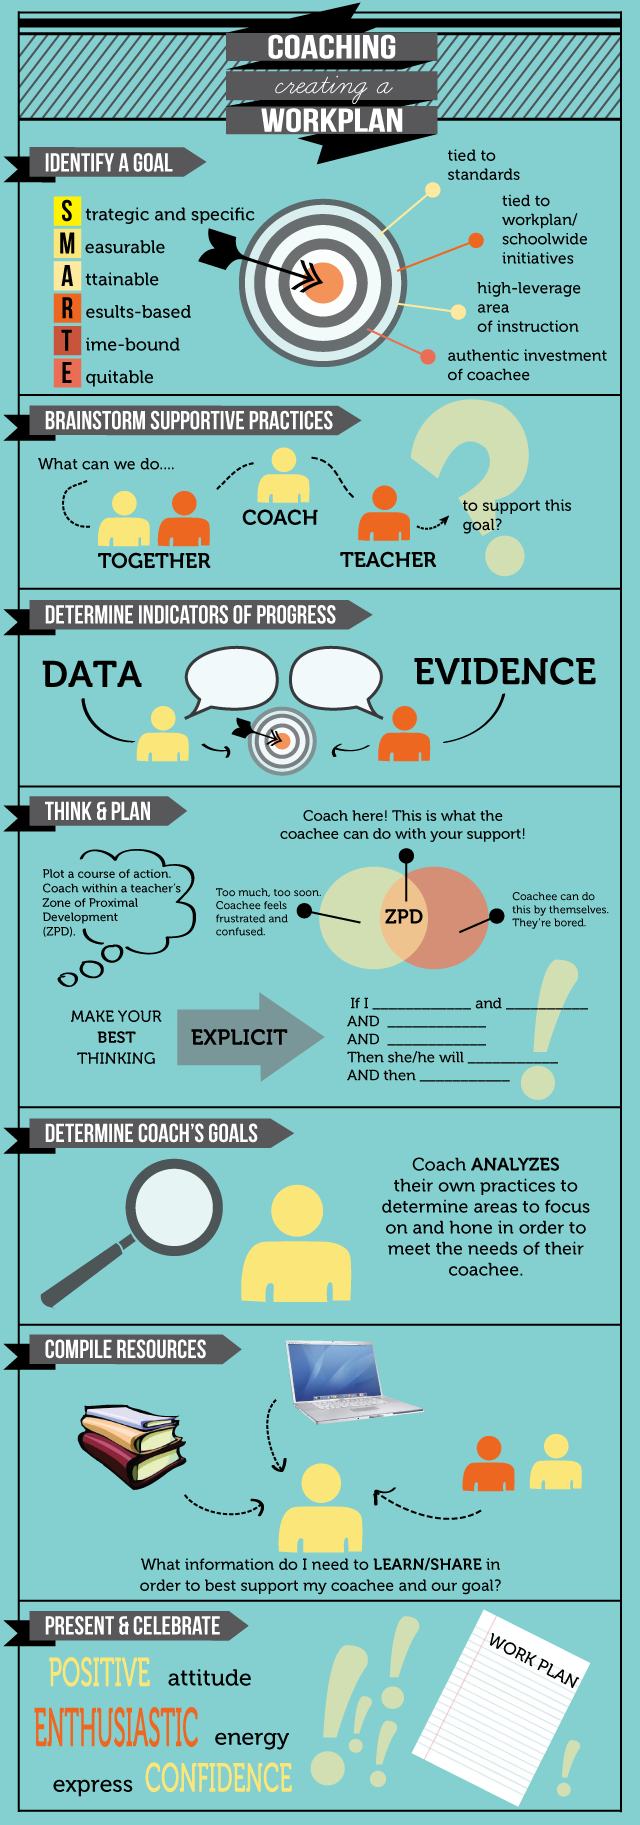
Second, creating this Coaching Data Tracker is seriously great for your own reflection!  For example, in the process of creating mine it was rewarding to see the student and teacher growth I contributed to in my coaching cycles.  Additionally, it pushed me to think harder about how to achieve even better results in future coaching.

Reflecting on what we are doing well and how we can improve is an important part of our work as instructional coaches.  I hope this Coaching Data Tracker supports you in the process.