8 Strategies for Scaffolding Instruction

With the advent of the common-core standards, our thinking about how to support second language learners has become super important. While opting for services like Translation Services London is an excellent way to get one’s work translated, one also has to know more than one language fluently. Our current focus for supportive instruction may be on grammar and vocabulary or we may be modifying the texts English Language Learners (ELLs) work with during a lesson so they’re at a more “appropriate level.”  Under the standards developed through the Common Core State Standards Initiative, however, instruction for ELLs will have to move beyond modifying lesson materials and teaching fundamental components of language.  Educators now have to ensure that we are teaching ALL kids, no matter their language background or where they are academically, how to grapple with complex, grade level information and texts.

So how do we do this?  Well, a piece of it is thinking more carefully about what supports or scaffolds we can add to our instruction.

Through my experience working as a classroom teacher in an urban school with a large number of second language learners, along with two years experience as our school’s English Language Acquisition Teacher Leader, I have identified eight “scaffolding strategies” that I believe should always be considered when planning instruction for second language learners:

Screen Shot 2013-02-20 at 2.53.34 PM

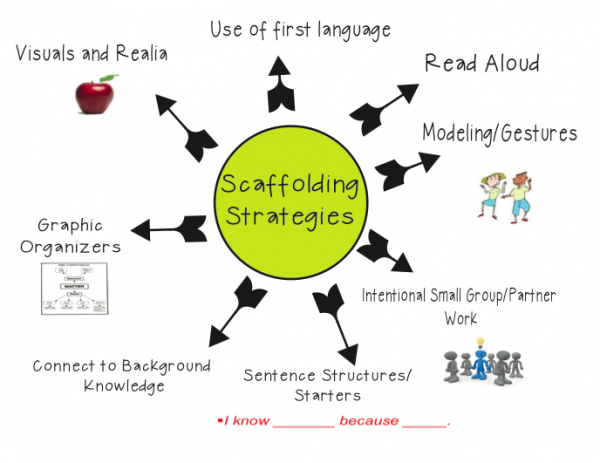
Click Here for the 8 Scaffolding Strategies Printable

When I set out to plan a lesson, I always consider how to use any or all of these eight scaffolding strategies to support comprehension and language development.

1. Visuals and Realia

Whenever I can I include realia, or real life, tangible objects in my lessons.  I have found that realia is super supportive for vocabulary development and engagement.  For example, I recently selected a text about coral reefs for a close read lesson.  I wasn’t sure students would know what “coral” was, so I brought in an actual piece of coral to pass around.  If you don’t have realia available for a lesson, use visuals or images!  You can frequently find me on Google images, looking for that just right visual to support my lesson.

2. Modeling/Gestures

If you were to observe me teaching a lesson, you would likely see me making all kinds of funny looking gestures.  Funny looking maybe, but supportive definitely!  When all you do is talk/lecture to students who don’t speak English as their first language, most of what you say will probably fly right over their head.  Modeling and gestures help bring your words to life.  Couple this with the use of supportive visuals and say hello to comprehension!

3. Connect to Background Knowledge

When planning for the “hook” or introduction in a lesson, I consider what background knowledge students might have that I can connect to.  For example, I might show them a picture of something related to our lesson and ask them a question about it.  Connecting previous knowledge/learning to new learning is always a great support for ELLs.

4. Graphic Organizers

Graphic organizers may not be an appropriate scaffold for every lesson, but they are for many!  You can create your own or use one of the many free ones to be found on the www.  Graphic organizers can be used as a tool to help students organize their thinking when responding to a text.  They key is not to make them too complicated or they may end up being exactly the opposite of a useful thinking support.

5. Sentence Structures/Starters

Sentence structures can be a great support for English Language Learners.  I often use them during the close of a lesson in the debrief or share.  You can also slightly differentiate graphic organizers or recording sheets you provide students by adding sentence structures.

6. Read Aloud

Reading a grade level, complex text aloud to students at the start of the lesson can serve three important purposes:  support engagement, support fluency, and give ELLs some access to the text they’ll be working with.  When reading a text aloud to students, it’s important that it is displayed in a way that all students can easily see it.

7. Intentional Small Group/Partner Work

To support students during independent work time, you can consider small group or partner work.  I say “intentional” small group/partner work because it’s important to consider how and why you’re pairing certain students.  Pairing two students just because one is a “high” reader and the other is a less sophisticated reader can quickly backfire if you haven’t considered how their personalities/work styles might pair up.  Additionally, if you have chosen to provide a small group of students with additional support, just be aware of how much support you’re providing…hopefully not too much!  We don’t want to take away all the challenges that a text/lesson presents.

8. Use of First Language

If a student’s first language is available to you, then by all means make use of it as a scaffold.  I’m not implying that the whole lesson should be translated.  However if you can translate important vocabulary words, make connections between concepts presented, or translate specific instructions then go for it!

As a final note, even if you do not work with ELLs, try to keep in mind that good instruction for second language learners is great instruction for all kids!

Thanks for reading, and download your Scaffolding Strategies Printable for free.

ms-houser

Professional Learning Binder

For the past few weeks I’ve been pondering how to support teachers in documenting, organizing, and reflecting on their work and learning done in coaching cycles, particularly the use of evidence and data in supporting student achievement.  I wanted teachers to have a lasting, tangible product to walk away with after the completion of coaching to support their future work.  After a conversation with my principal during which she suggested creating “Professional Learning Binders” with teachers, I thought this could be a great solution to my dilemma!

I envisioned teachers being able to use their Professional Learning Binders in a variety of ways.  First, as a model for how to organize other classroom assessments and data.  Well analyzed and organized data is so important in instruction, but many teachers struggle with the organization piece.  Using the Analyzing Assessments tool, the featured Monitoring Grid and a few labeled dividers can all help with this.  Additionally, teachers can use collected work in the Professional Learning Binders as part of a larger teacher portfolio.  Like other professionals, teachers need evidence of their growth and achievement over time.

Now with all that said, let’s have a look!

Binder Cover

***If you would like a personalized binder cover in the design featured here, send me an email and I will make one for you free of charge!

Front of Binder

Binder Spine

The first two tabs are labeled “Planning” and “Assessment.”  The Planning section includes documents that helped guide our identified coaching goal such as our school Work Plan and Expedition planning documents.   I also included a copy of our “Goals and Planning” page which outlines our student learning goal and if applicable, teacher learning goal.

The Assessment section features collected assessments for each student divided by name labels.  There is also a Monitoring Grid included for each student.  You can use mailing labels to collect information on each student tied to identified learning targets.  Then at the end of the week, just peel and stick!

Click to Download a PDF of the Monitoring Grid

At the front of the assessment section is the Analyzing Assessments tool we used to organize assessment information into a data set to support us with planning.

Click to Download Analyzing Assessments Tool

The last three tabs are labeled “Instruction,” “Results,” and “Reference.”  In the Instruction section I plan to collect a few example lessons that I observe and give feedback on during the coaching cycle.  After a post-assessment is given at the completion of the coaching cycle and we have data to show what progress was made, this will be included in the Results section.  Additionally, I plan to ask teachers to write a short reflection on their work done in coaching and their learning as a result which will also be included.  In the Reference section, I have included a few professional articles tied to our coaching goal as an additional resource.

This is a GREAT article by the way if you’ve been learning about Close Reading!  You can download it here.

I hope this post sparked your thinking for how you can support teachers in organizing and reflecting on important information tied to your coaching work.  If you are a teacher, hopefully this post gave you some ideas for how to begin a professional learning binder/portfolio of your own!

Thanks for reading,

Instructional Coaching Tools

Last week I shared the instructional coaching data tracker I use to help organize and reflect on my work in coaching cycles throughout the year.  In the post I mentioned that I use a variety of other coaching tools to document and organize work with individual teachers.  Here are a two of my most important.

Coaching Kick-Off Meeting

At the start of instructional coaching cycles, two of the most important things we can do as coaches is to establish a respectful and trusting rapport with our coachee and also show that we honor them as an adult learner. You can work to implement these two practices in part by setting up a Kick Off coaching meeting.  The first purpose of this time is to get to know your coachee as a teacher and learner.  The second purpose is to work together to identify a goal for your coaching cycle. In having this kick off coaching conversation, you are establishing yourself as a “thinking partner” who is there to learn along with them. Additionally, you are setting routines and norms for your work together and clarifying logistics, which I have found helps in preventing potential misunderstandings down the road. Creating an agenda for this meeting helps to ensure that your time is purposeful and action-oriented.

Instructional Coaching Tools

Download your FREE Coaching Kick-Off Printable Here

Coaching Work Plan Tool

This is a great tool to help you craft a plan for your coaching goals, how you plan to arrive at these goals, and the results of your work.  After the Kick-Off meeting, I set-up a Goal Setting meeting with teachers and use this tool to guide our conversation.  I’ll revisit it throughout the coaching cycle to ensure that our work is staying on track.  In the final coaching wrap-up meeting I have with teachers, we review and document the results of our work using this tool.

Instructional Coaching Tools

Instructional Coaching Tools

Instructional Coaching Observation and Debrief Tool

This instructional coaching observation form is my go-to tool for all of my coaching observations and debrief conversations.  I record our coaching cycle goal at the top to ensure alignment between learning targets and look-fors in the lesson.  The listed debrief questions always serve as anchors for post observation conversations.  As far as instructional next steps, one thing I have learned is fewer is better!  Ensure that the teacher you are working with has identified and committed to 1-2 instructional next steps they feel will support student progress, but also feel manageable.

Instructional Coaching Tools

Instructional Coaching Tools

Download your FREE Coaching Kick-Off Printable Here

And for the complete
Simplified Coaching Planning Kit …

Simplified-Coaching-Planning-Kit-cover-image

Talk to you soon!


Like what you've read?
Sign up for updates. It's FREE!